10 Insanely Easy Front Door Decorations to DIY for Halloween
Easy Halloween Door Decorations: DIY Bat Swarm Front Door
Looking for spooky but simple Halloween door decorations? This DIY bat swarm is a budget-friendly way to transform your front door into a haunted entryway using just black paper and a bit of creativity.

What You’ll Need for this bat door decoration:
- Black cardstock or construction paper
- Scissors
- Pencil or chalk for tracing
- Double-sided tape or adhesive putty
- Optional: glow-in-the-dark paint, fishing line, or string
How to Make This Bat Swarm Halloween Door Decoration:
- Cut Out the Bats
Use a printable bat template or sketch a few bat shapes freehand. Vary the sizes for a more natural “swarm” effect. Trace onto black paper and cut them out carefully. - Add a 3D Effect
Fold each bat slightly in half and bend the wings upward to give them a lifelike, dimensional look. - Arrange the Swarm
Plan your layout before sticking the bats on your front door. A diagonal or swirling pattern from one corner makes it look like bats are flying out of your home! - Attach the Bats
Stick the bats to your door using double-sided tape or removable adhesive putty. For an extra spooky vibe, hang a few with fishing line so they float midair. - Enhance the Spook Factor
Use glow-in-the-dark paint on a few bats to make your Halloween door decor pop at night. Add spiderwebs, faux branches, or a witchy wreath for a full-door transformation.
Why This Halloween Front Door Decoration Works:
- Easy and cheap Halloween door decoration with a big visual impact
- Perfect for last-minute Halloween porch decor
- Customizable to fit any door color or style
String Light Pumpkins: Cozy Halloween Door Decorations with a Glow
If you’re looking for warm, welcoming Halloween door decorations with a bit of sparkle, string light pumpkins are the perfect solution. This easy DIY combines fall vibes with festive lighting to make your porch pop after dark.
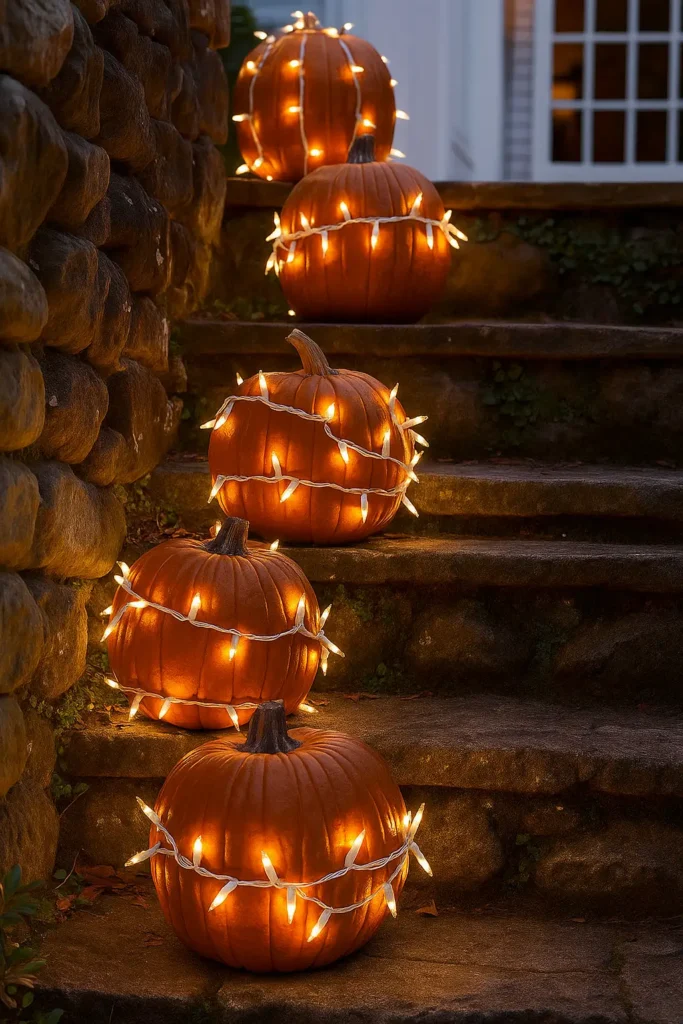
What You’ll Need to Glow up your door with string light pumpkins:
- Real or faux pumpkins (various sizes work best)
- Battery-operated string lights or fairy lights
- Push pins, floral wire, or glue dots (depending on your method)
- Optional: hay bales, lanterns, or a fall doormat to style your setup
How to Make String Light Pumpkins for Your Front Door:
- Prep Your Pumpkins
Clean and dry your pumpkins, especially if using real ones. Arrange them near your front door in a group of three or more for a cozy, layered effect. - Wrap the Lights
Starting from the base, gently wrap string lights around each pumpkin. You can spiral upward for a classic look or weave the lights across the sides for more glow coverage. - Secure the Lights
Use small push pins (for real pumpkins), glue dots, or floral wire to keep the lights in place. Be sure your battery packs are tucked out of sight or placed behind the pumpkins. - Light Up Your Entryway
Once all pumpkins are wrapped, flip the switch and watch your Halloween door decorations come to life. The soft lighting creates a magical ambiance for trick-or-treaters or guests. - Add Fall Accents
Surround the pumpkins with leaves, cornstalks, or Halloween-themed signage for extra visual appeal. Mix in black lanterns or metallic accents for a more modern Halloween look.
Why This Halloween Front Door Decoration Works:
- Combines fall and Halloween styles for a versatile front porch display
- Easy to assemble, reusable, and renter-friendly
- Adds visual interest to your door area day and night
Halloween Hanging Ghost: Budget-Friendly Pottery Barn-Inspired Door Decorations
Turn your front porch into a haunted entryway with these floating ghosts that look high-end but cost just a few dollars. This DIY Halloween door decoration is a clever knock-off of Pottery Barn’s iconic ghost decor, using dollar store supplies and a few simple steps.
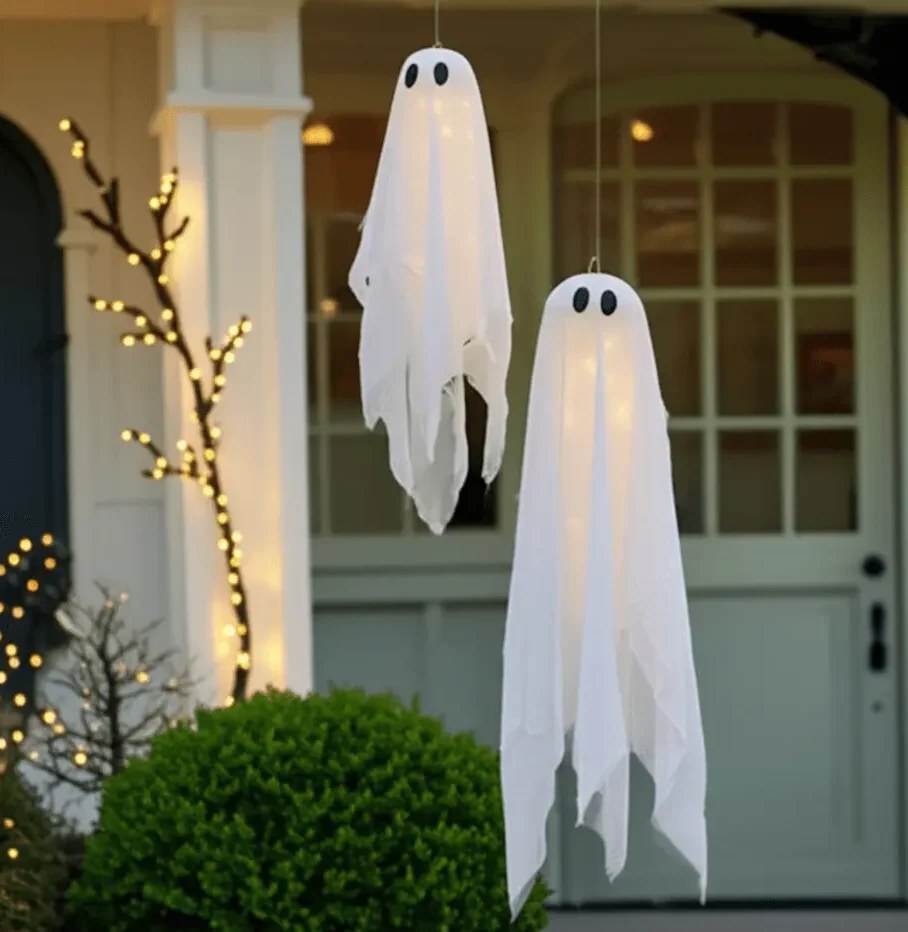
What You’ll Need To Make these hanging Ghost door decorations:
- Bouncy balls or large white balloons (kid’s section or party store)
- White spray paint
- Cheesecloth fabric (dollar store, craft store, or Halloween aisle)
- Black felt, Sharpie, construction paper, or foam core (for eyes)
- Spray adhesive (recommended: 3M or similar)
- Fishing line
- Hanging method: white nail, Command Hook, or eyescrew
How to Make a Hanging Ghost for Your Front Door:
- Prep the Ghost Head
Start by spray-painting your bouncy ball or balloon white. Let it fully dry. This will act as the head structure for your ghost. - Drape the Cheesecloth
Cut and layer a few sheets of cheesecloth over the top of the ball or balloon, letting it fall freely to form a ghostly shape. For extra effect, use several layers to create texture and movement in the fabric. - Add Eyes
Cut out ghost eyes from black felt, paper, or foam core. You can also draw them on with a Sharpie. Use spray adhesive to secure them to the front of the fabric. - Attach the Hanging Hook
To suspend the ghost, insert a small white nail into the ball’s air hole, or attach an eyescrew or Command Hook to the top. Tie fishing line to the hook or screw, leaving a long lead for hanging. - Hang and Float
Suspend the ghost from your porch ceiling, door frame, or a tree branch near your front door. Use multiple ghosts at different heights for a dramatic floating effect.
Why This Halloween Front Door Decoration Works:
- Lightweight, weather-resistant, and easy to assemble
- Creates floating movement with every breeze
- High-impact Halloween door decoration on a small budget
DIY Halloween Front Door Decor: Make Paper Spiders
Looking for easy and affordable front door Halloween decorations? These DIY paper spiders are a spooky yet simple way to give your entryway a haunted makeover. Using just black construction paper, scissors, and tape or glue, you can craft creepy paper spiders that look great crawling across your front door or porch. Perfect for last-minute decorating, these budget-friendly Halloween crafts are a fun way to impress trick-or-treaters and create a chilling first impression.

What You’ll Need To Make these Front Door Spiders:
- Black construction paper or cardstock (for sturdy, spooky spiders)
- Spider template (draw your own or print one from online)
- Scissors (for precise cutting)
- Double-sided tape or removable mounting putty (to attach spiders without damaging your door)
- Pencil or white chalk (for tracing templates onto black paper)
- Optional: Googly eyes (for a fun, kid-friendly touch)
- Optional: White thread or faux spider web (to add web details or connect spiders)
How to Make Paper Spiders for Your Front Door:
- Create Your Spider Template
Draw or print a spider outline—body and eight legs included. Use different sizes to create visual variety (smaller spiders creeping near the bottom, larger ones “climbing” up the door). - Cut and Fold for Depth
Carefully cut out each spider. For a 3D effect, bend the legs slightly at the “joints” so they pop away from the door once mounted. - Arrange Your Spiders
Plan your layout: crawling up the side of the door frame, swarming around a wreath, or clustered at the base like a spider nest. Groupings of three or more tend to look the most dynamic. - Stick Them On
Use double-sided tape or removable putty to secure each spider. For added realism, place some at awkward angles or halfway under a decoration—like they’re hiding. - Optional Embellishments
Add googly eyes for a playful twist, or connect a few spiders with white thread to mimic a web. A faux cobweb backdrop adds instant drama.
Why This Halloween Front Door Decoration Works:
- Lightweight and easy to remove—ideal for renters
- Customizable in size, style, and creep factor
- Adds motion and texture to your Halloween front door decorations
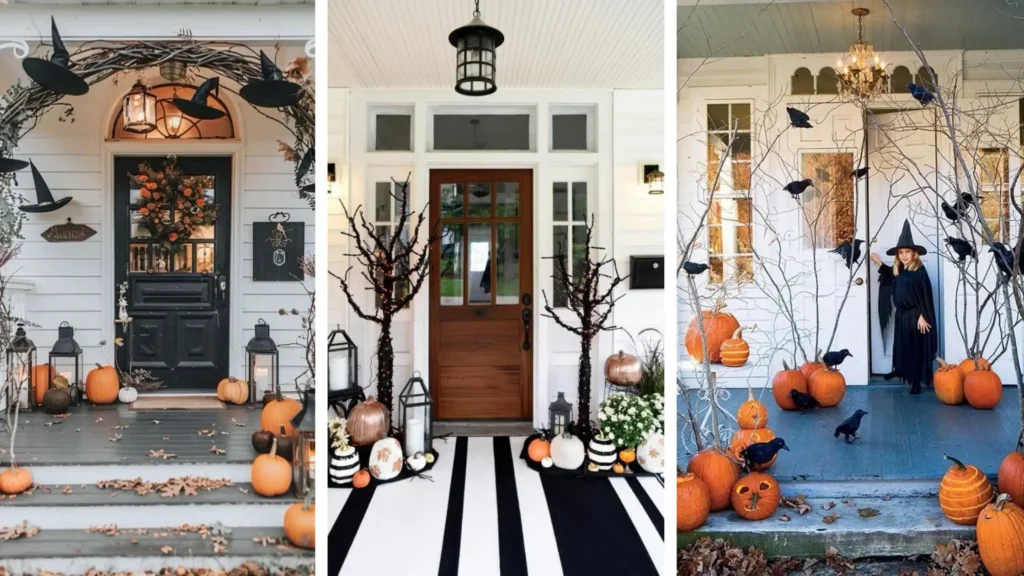
Beetlejuice Striped Theme: Bold & Easy Halloween Front Door Decorations
Want to create a striking Halloween front door decoration that’s both spooky and stylish? This Beetlejuice-inspired striped theme uses classic black and white stripes for a bold, eye-catching look — perfect for fans of the creepy and kooky vibe. With just a few simple elements like a striped doormat and creatively painted pumpkins, you can transform your entryway into a Halloween statement piece!
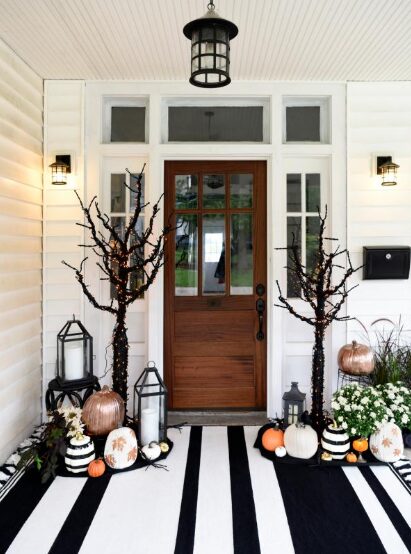
Photo by Sarah Busby, Styling by H. Camille Smith
to add a beetlejuice flair to your halloween front door decor you will need:
- Black and white striped doormat (or black and white paint to create stripes)
- Small pumpkins or gourds
- Black and white acrylic paint or spray paint
- Paintbrushes or painter’s tape for clean stripes
- Optional: faux spiderwebs, black ribbon, or Halloween-themed signs
How to Create Your Beetlejuice Striped Front Door Decor:
1. Start with a Striped Doormat
Find a black and white striped doormat to set the tone right at your doorstep. If you can’t find one, you can easily DIY by painting stripes onto a plain mat using painter’s tape and outdoor acrylic paint.
2. Paint Striped Pumpkins
Gather small pumpkins or gourds and create bold stripes using black and white paint. Use painter’s tape to mask off clean, even stripes for a professional finish. Alternate colors or create vertical or diagonal stripes for variety.
3. Arrange Pumpkins Creatively
Place your striped pumpkins along the doorstep, on steps, or clustered in a decorative crate. Mix in some plain black or white pumpkins for contrast.
4. Add Coordinated Accents
Enhance the look with black faux spiderwebs, a black-and-white Halloween wreath, or a sign with a spooky Beetlejuice quote like “It’s showtime!” Black ribbon tied in bows or hanging from the door knocker also adds a chic touch.
5. Optional Lighting
Use white or black lanterns with flickering LED candles to highlight the striped theme at night and add an eerie glow.
Why This Halloween Front Door Decoration Works:
- The black and white striped pattern creates a bold, instantly recognizable Halloween look inspired by Beetlejuice
- Simple DIY elements make this budget-friendly and easy for last-minute decorating
- Customizable for any porch size and works well with additional Halloween decor like spiderwebs or themed signs
- Stands out on social media for a unique and stylish Halloween aesthetic
DIY Spiderweb Window Decoration: Yarn Craft for Halloween Door Displays
Looking for a budget-friendly Halloween door decoration that adds big curb appeal? This DIY spiderweb window display is made from black yarn and tape—and makes your entryway look instantly haunted.
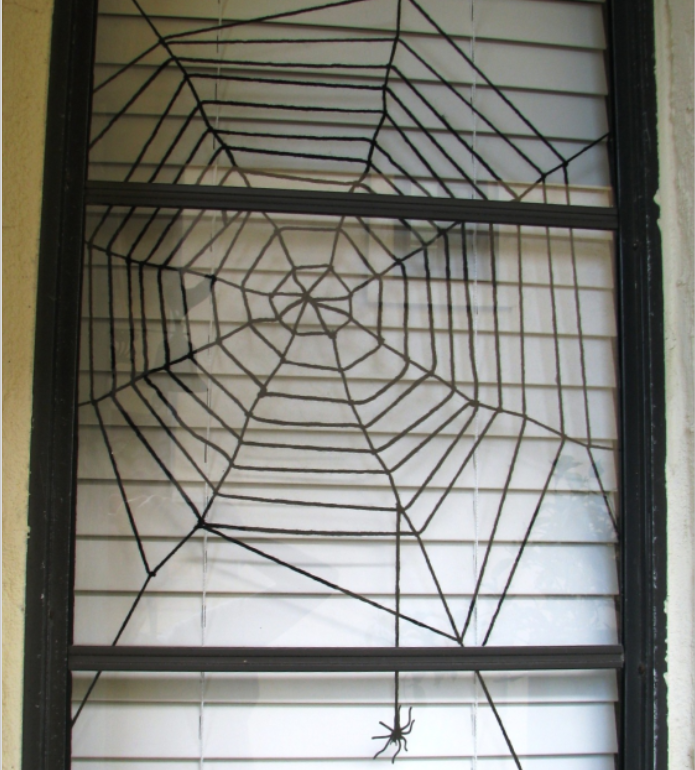
For Front Door Spiderwebs you will Need:
- Black yarn
- Scissors
- Clear tape (like Scotch tape)
- Optional: plastic spider or DIY spider cutout
How to Make a Yarn Spiderweb for Your Front Window:
- Build the Web Frame
From inside your home, cut several long strands of black yarn and stretch them across your front window, taping each end to the window frame (not the glass). Crisscross the strands so they meet at the center. Tie them together at that point with an extra piece of yarn to secure the hub, then tape down the loose end. - Spin the Web
Cut a 3-foot (or longer) piece of yarn. Starting 4–5 inches from the center, tie one end to a strand. Work your way around the framework, tying the yarn to each spoke in a spiral pattern. Stay consistent with your knot direction (clockwise or counterclockwise) for a clean look. Make multiple rings outward as desired, adjusting spacing and shape for a more organic or spooky style. - Add a Spider
No web is complete without a spider. Tape or tie a lightweight spider to the center or dangle one from the top of the frame.
Why This Halloween Front Door Decoration Works:
- Eye-catching Halloween door decoration using just yarn and tape
- Customizable to any window or porch light setup
- Great for renters—removes easily with no damage
Spooky Crow & Branch Halloween Front Door Decorations
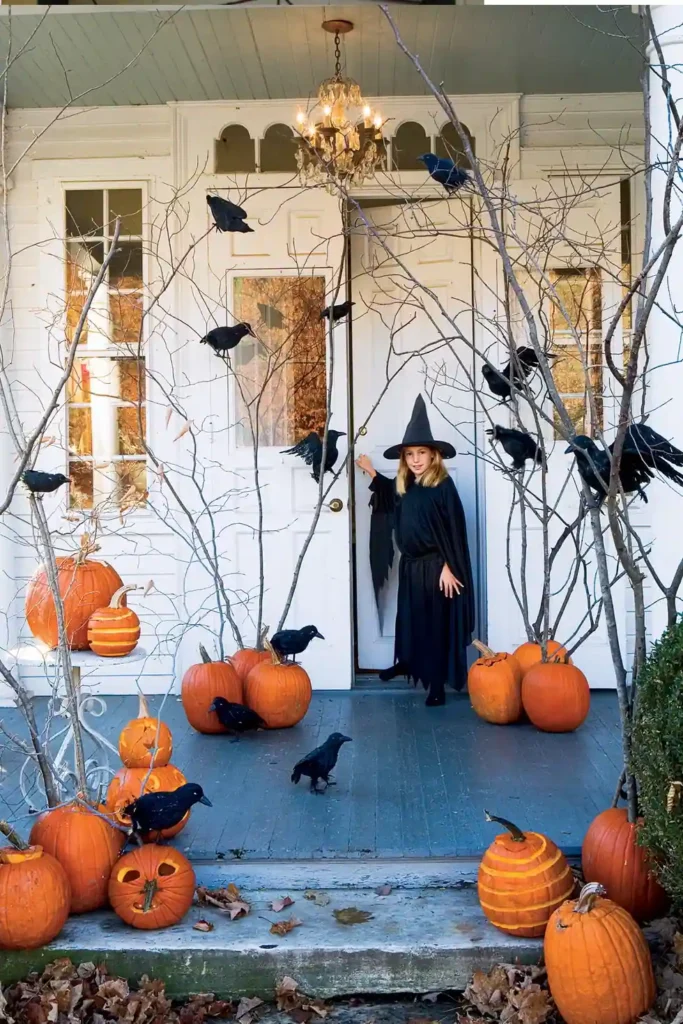
Looking for eerie Halloween front door decorations that are a perfect match for your witches costume? Decorative crows perched on twisted branches create an instantly spooky vibe that’s perfect for Halloween. Whether you secure them in rustic pots or hollowed-out pumpkins, this easy DIY adds creepy character to your porch — no complicated crafting required!
What You’ll Need to spook up your front door with crows:
- Decorative black crows (plastic or faux feathers)
- Twisted branches or faux tree limbs
- Large pots, planters, or hollowed-out pumpkins
- Floral foam or styrofoam block (to secure branches)
- Optional: faux moss, dried leaves, or spiderwebs for extra texture
How to Make This Crow & Branch Halloween Decoration:
1. Choose Your Base
Pick sturdy pots or planters that suit your porch style. For a natural look, use terra cotta or black pots. Alternatively, hollow out a large pumpkin to serve as a spooky container.
2. Secure the Foam
Place floral foam or styrofoam inside your pot or pumpkin to hold branches upright and stable.
3. Arrange Twisted Branches
Insert the twisted branches into the foam, fanning them out for a wild, eerie silhouette. Use a mix of branch lengths for a natural effect.
4. Add Decorative Crows
Position your decorative crows perched strategically on the branches. Use hot glue or floral wire to secure them if needed. Vary their heights and angles to mimic real crow behavior.
5. Add Finishing Touches
Fill in any gaps with faux moss, dried leaves, or drape delicate spiderwebs over the branches for extra spooky texture.
6. Place and Enjoy
Set your crow and branch arrangement by your front door, on steps, or flanking your entryway for maximum creepy impact.
Why This Halloween Front Door Decoration Works:
- Black crows on gnarled branches evoke classic Halloween spooky vibes without being over-the-top
- Using pots or pumpkins as bases makes this a versatile decoration for any porch size or style
- Easy to customize with seasonal accents like moss, leaves, or lights for extra dimension
- Reusable materials mean you can enjoy this decoration year after year
Witches Britches: Quirky & Creepy Halloween Front Door Decoration
Looking to add a delightfully quirky and spooky twist to your Halloween front door decorations? Try the Witches Britches DIY — an upside-down witch effect using mannequin legs dressed in classic striped stockings, popping out of a pot! This eye-catching and humorous setup is sure to grab attention and add a playful scare to your porch.
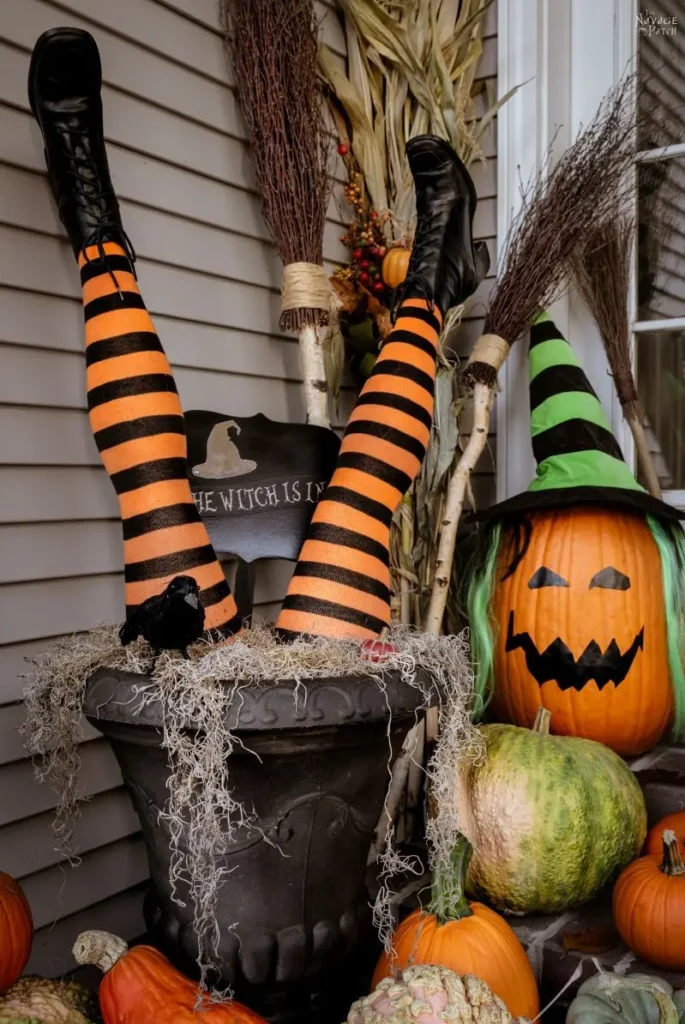
What You’ll Need for front door britches:
- Mannequin legs or pantyhose and stuffing for DIY legs
- Black and white or black and orange striped stockings
- Large flower pot or cauldron-style container
- Stuffing material (cotton, fabric scraps, newspaper)
- Black tulle, fake spiderwebs, or Halloween moss (optional)
- Hot glue or strong tape (optional)
How to Make the Witches Britches Halloween Decoration:
1. Make or Dress the Legs
- Using mannequin legs: Simply slip on the striped stockings for that iconic witchy look.
- DIY mannequin legs: Fill pantyhose with stuffing material like cotton balls, fabric scraps, or crumpled newspaper. Tie off the ends securely to form leg shapes. Pull on the striped stockings over the stuffed pantyhose for a realistic effect.
2. Prepare the Pot
Select a large flower pot or Halloween-themed cauldron. Fill it with stuffing, foam, or crumpled newspaper to create a stable base for the legs.
3. Position the Legs
Insert the legs upside down into the pot, so the feet stick straight up, and the knees are hidden inside. This creates the illusion of a witch stuck headfirst in the container.
4. Add Finishing Touches
Drape black tulle, fake spiderwebs, or moss over the pot for a magical, eerie look. Add a witch hat tipped to one leg or a broomstick nearby for extra charm.
5. Display Your Decoration
Place your Witches Britches on your porch, steps, or beside your front door to wow guests and trick-or-treaters with this playful Halloween surprise!
Why This Halloween Front Door Decoration Works:
- Unique and humorous twist on classic witch decorations
- Quick and budget-friendly to make with household materials
- Customizable with different stockings and props for personal style
Floating Witch Hat Porch Lights: Magical Halloween Front Door Decoration
Create a glowing, floating witch hat display that brings spooky charm and nighttime magic to your Halloween front porch!
If you’re looking for a Halloween front door decoration that’s high-impact, low-cost, and super simple to make, this floating witch hat project is a must. Using just a few cheap supplies, you can create the illusion of levitating hats — and they look incredible lit up at night.
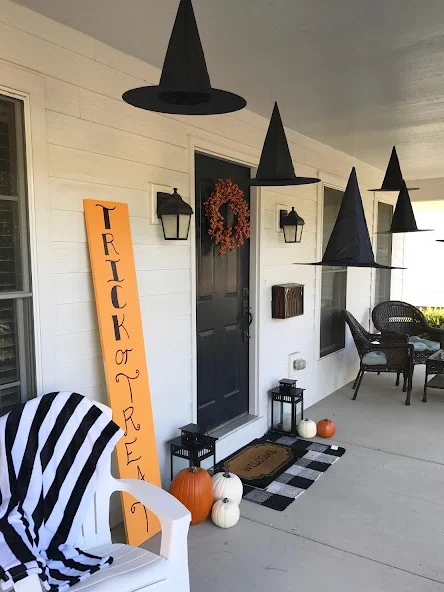
For front door floating witch hats You Will Need:
- 3–6 black witch hats (lightweight, felt or nylon)
- Battery-operated tea lights or LED fairy lights (one per hat)
- Fishing line or clear thread
- Safety pins or small paperclips
- Command hooks (indoor/outdoor, depending on porch type)
- Optional: black ribbon or tulle for extra flair
How to Make Floating Witch Hats
- Insert the Light
Flip your witch hats inside out and attach a tea light inside the tip of each hat.- Use a safety pin or paperclip to fasten it to the fabric.
- For extra sparkle, try wrapping a short LED string light around the inside.
- Attach Fishing Line
Cut a length of clear fishing line (around 2–3 feet depending on your ceiling height).
Tie or pin it to the top of the hat, just above the light. Make sure the line is centered so the hat hangs straight. - Hang from Porch Ceiling
Use removable Command hooks or ceiling tacks to suspend the fishing line from your porch ceiling, above your front door. Space them out for an eerie floating effect. - Style the Scene
Add ribbon tails, floating bats, or cobwebs around the hats for even more witchy vibes. You can also place a broom or cauldron by the door to complete the theme.
Why This Halloween Front Door Decoration Works:
- Budget-friendly — Great results with dollar store supplies
- Eye-catching at night — Glowing hats create an eerie ambiance
- Quick DIY — Set it up in under 30 minutes
- Perfect for Pinterest & Instagram — Highly photogenic!
Pumpkin Stack Topiary: Elegant Halloween Entryway
Bring elevated autumn charm to your Halloween front door with this simple yet stunning pumpkin topiary DIY.
If you’re after a Halloween decoration that’s more chic than creepy, a stacked pumpkin topiary is the perfect solution. It adds curb appeal, layers beautifully with other fall décor, and can easily transition from Halloween to Thanksgiving.
To make pumpkin stack decorations for your front door you Will Need:
- 3–5 faux or real pumpkins (varying sizes)
- Heavy-duty glue (for faux pumpkins)
- Urns, planters, or woven baskets
- Optional: battery fairy lights, faux fall leaves, eucalyptus, ribbon, or a black crow figure
How to Make a Pumpkin Stack Topiary:
- Choose Your Pumpkins
Use real pumpkins for a natural farmhouse look or faux pumpkins if you want to reuse them every year. Go for varying sizes and colors (classic orange, white, sage green, or even metallic). - Prep Your Base
Fill your planter or basket with bricks, floral foam, or a weight to keep your tower stable. - Stack & Secure
Begin with the largest pumpkin on the bottom. Stack smaller ones on top, securing each layer with hot glue (for faux) or wooden skewers (for real). Angle some slightly for a charming, imperfect look. - Add Details
Wrap fairy lights through the stack, tuck in faux leaves between layers, or add a chic bow to the top pumpkin. A perched black crow or a mini witch hat gives it a subtle Halloween twist.
Why This Halloween Front Door Decoration Works:
- Elegant & versatile — Works for both Halloween and general fall styling
- Instagram-worthy — Polished, high-end look with minimal effort
- Customizable — Make it spooky, rustic, or modern to suit your style
From eerie elegance to playful DIYs, these front door decorations prove that Halloween style doesn’t have to be complicated (or costly). Whether you’re crafting floating witch hats, chic pumpkin topiaries, or a full-on Beetlejuice moment, each idea brings personality and charm to your entryway. So grab your glue gun, light those fairy lights, and let your door set the scene for a truly spooktacular season.
Discover More Spooktacular Halloween Inspiration
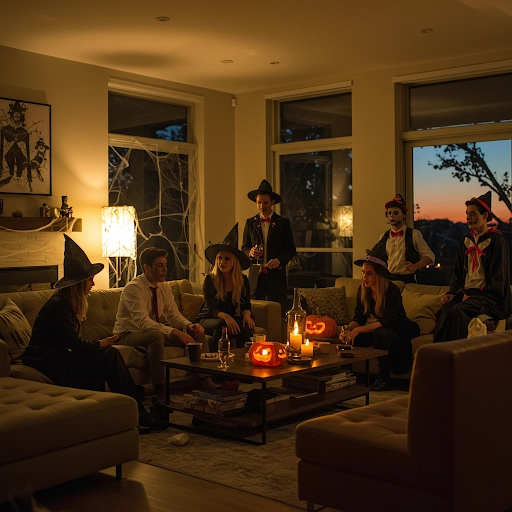
Master the art of the Halloween spread: Once you’ve prepped your snacks, take your hosting to the next level with our Halloween Charcuterie Board Ideas or get the full blueprint in our guide on How to Host a Halloween Party. For more crowd-pleasing party food, don’t miss our Super Bowl Party Food or our favorite Movie Night Charcuterie Board Ideas.
Transform your space for a gothic night: Create a moody, sophisticated atmosphere with Elevated Vampire Halloween Decor.
Refine your signature Halloween style: Your look is the ultimate party accessory. Find your perfect manicure in our Halloween Nail Ideas collection or grab your besties for these 35 Spook-tacular Trio Halloween Costume Ideas. For a more classic finish, explore our White Lace Nails or find edgy elegance with the Moon Style Root and Chrome Nails Aesthetic.