Creative 4th of July Charcuterie Board Ideas: From Sweet Candy to Savory Grazing
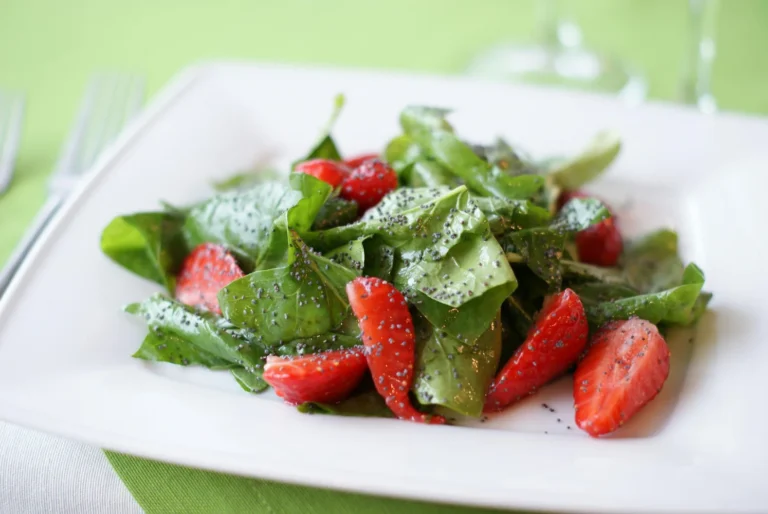
Ok, if you’ve been following my blog or Pinterest for a while, you might have noticed I’m obsessed with Charcuterie boards. I like how easy (and fun) they are to make and I think they look pretty impressive. Here you will find the inspiration I used on my own board and then my designs at the end :). To get the impact from the red and blue, I have to admit, the health factor when out the window. Maybe next year I’ll go for strawberries, blueberries and cream cheese!
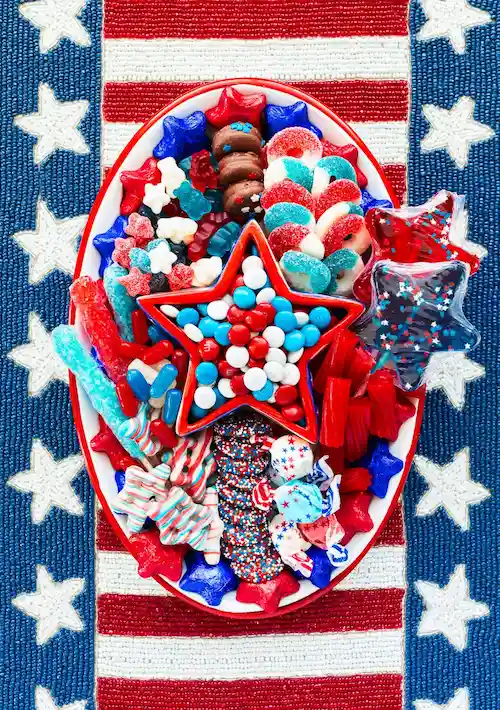
The “Star-Spangled Sweets” Platter
This board is a vibrant, high-energy take on the traditional charcuterie concept, trading meats and cheeses for a Red, White, and Blue Candy Explosion theme. It’s designed to be a playful, patriotic centerpiece that leans into nostalgia and fun rather than formal dining.
What You’ll Need to Make It
To recreate this specific look, focus on a mix of textures and shapes within the patriotic color palette:
- The “Anchor” Piece: A star-shaped bowl for the center (filled here with red, white, and blue chocolate candies like M&Ms).
- Gummy & Chewy Sweets: Red licorice twists, blue sour belts or “bricks,” gummy stars, and peach rings (in red/white/blue variations).
- Chocolate & Baked Goods: Mini chocolate-covered cookies, star-shaped frosted sugar cookies, and pretzel rods dipped in white chocolate with star sprinkles.
- Hard & Specialty Candy: Swirl lollipops, rock candy sticks, and star-shaped gummy skewers.
- The Base: A large white oval platter to make the colors pop.
Is It Easy to Make?
Yes, absolutely. This is much easier than a traditional savory board because:
- No Prep Cooking: Everything is store-bought and assembly-only.
- No Perishables: You don’t have to worry about cheese sweating or meat oxidizing if it sits out during a party.
- Low Precision: The “maximalist” style means the more you crowd the board, the better it looks. There are no “wrong” placements as long as the colors are distributed evenly.
What Makes It a Great 4th of July Board?
- Thematic Shapes: Using star-shaped cookies and bowls reinforces the theme without needing a “Happy 4th” sign.
- Visual Impact: The tight color coordination (avoiding greens, yellows, or purples) creates an instant “wow” factor that fits the holiday perfectly.
- Crowd-Pleasing: It appeals to all ages, especially at a family BBQ where kids can grab small bites easily.
- Texture Variety: By mixing matte chocolates, glossy gummies, and sparkling sugared rings, the board looks professionally styled even if it only took 15 minutes to put together.
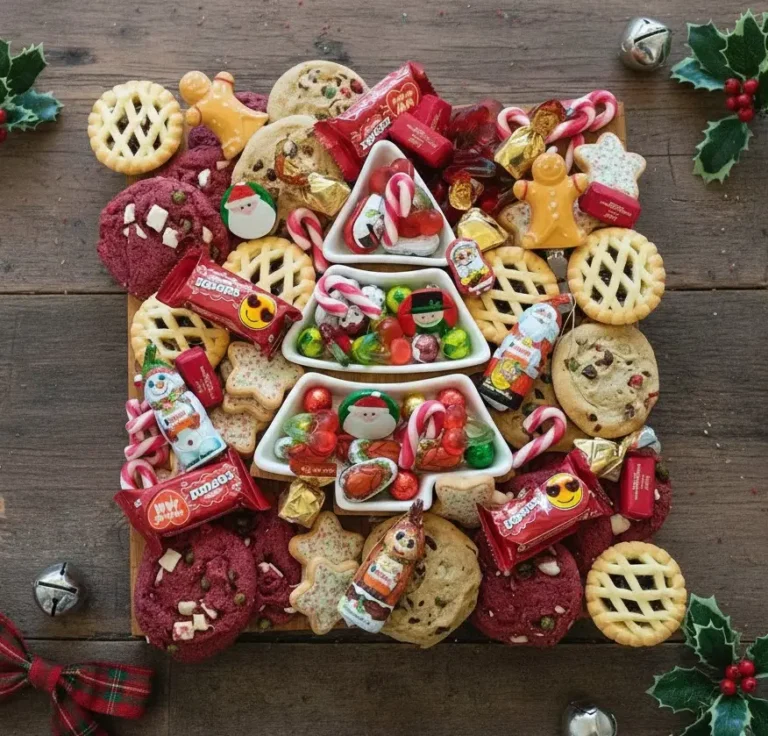
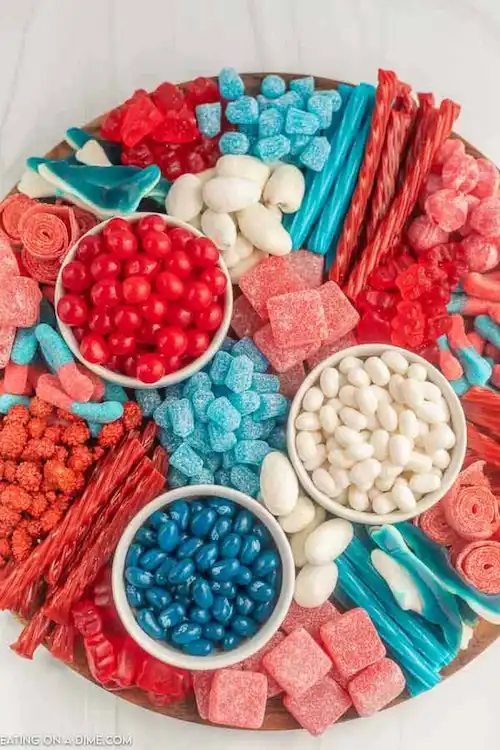
The “Sweet Liberty” Snack Board
This board takes a more structured, modern approach to a holiday treat platter. It’s a Monochromatic Candy Mosaic theme, using small bowls to anchor the design and creating distinct “color blocks” of red, white, and blue sweets for a clean yet festive aesthetic.
What You’ll Need to Make It
To get this specific look, look for candies that provide bold, solid colors:
- Anchors: Three small white ramekins or ceramic bowls.
- Red Selection: Cherry sours or gumballs (for the bowl), red licorice twists, cinnamon bears or gummy sharks, and sour watermelon cubes.
- Blue Selection: Blue jelly beans (for the bowl), blue raspberry sour belts, blue gummy sharks, and blue rock candy or “nugget” gummies.
- White Selection: White jelly beans or yogurt-covered raisins (for the bowl) and large white marshmallows or “puffy” gummies.
- The Base: A round wooden board to provide a natural, warm contrast to the bright candy colors.
Is It Easy to Make?
Extremely easy. In fact, this layout is even simpler than the first because of the “Bowl First” method:
- Place your three white bowls on the board in a triangular pattern.
- Fill the bowls with your smallest candies (jelly beans, gumballs).
- Fill the gaps with the larger items, alternating colors as you go.
- Total assembly time is roughly 10 minutes, making it a perfect last-minute option.
What Makes It a Great 4th of July Board?
- Durability: Just like the first board, these items won’t melt or wilt in the summer heat, making it ideal for an outdoor celebration.
- Modern Aesthetic: The use of white bowls and a wooden board feels a bit more “refined” and adult-friendly while still being fun.
- Color-Blocked Design: Grouping the colors together makes the patriotic theme feel intentional and organized, which translates very well in photographs.
- Easy Grazing: Because the candies are mostly bite-sized and organized, guests can grab exactly what they want without “digging” through a pile.
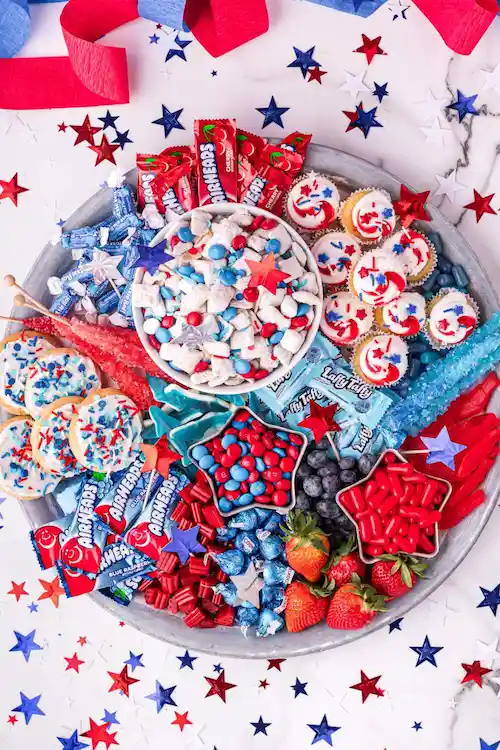
The “Patriotic Party Platter”
This board shifts from a pure candy focus to a Hybrid Snack & Dessert theme. It’s a maximalist approach that combines childhood favorites, fresh fruit, and mini bakery items, making it feel like a full dessert station on a single tray.
What You’ll Need to Make It
To achieve this varied and high-energy look, you’ll need a mix of wrapped and unwrapped items:
- The “Hero” Bowl: A large central bowl filled with “Puppy Chow” (Muddy Buddies) tossed with red, white, and blue chocolate gems.
- Bakery Elements: Mini vanilla cupcakes with star sprinkles and frosted sugar cookies.
- Fresh Balance: Whole strawberries and a handful of blueberries to add natural color and a break from the sugar.
- Nostalgic Wrapped Treats: Airheads (cherry and blue raspberry), Laffy Taffy, and blue-foil-wrapped chocolate kisses.
- The “Sparkle” Factors: Red and blue rock candy sticks and star-shaped cookie cutters used as small serving vessels for loose candies.
- The Base: A large galvanized metal or grey rimmed tray for a rustic, summer-cookout vibe.
Is It Easy to Make?
Yes, it’s a “semi-homemade” win.
- The Effort: Most of the items are shelf-stable or store-bought. The only “work” involved is making the puppy chow (which is a 10-minute microwave task) and arranging the items.
- The Strategy: Use the bowls and cookie cutters first to create a “pathway” across the tray, then fill in the larger gaps with cupcakes and cookies, and finally tuck the wrapped candies into the remaining small holes.
What Makes It a Great 4th of July Board?
Interactive Visuals: Using star-shaped cookie cutters as bowls is a clever, inexpensive styling trick that reinforces the patriotic theme without extra clutter.
Something for Everyone: By including fruit and chocolate alongside gummies and cupcakes, you cater to different tastes (some guests want a strawberry, others want an Airhead).
Texture & Height: The rock candy sticks and upright cupcakes create varying heights, making the board look more professional and dynamic than a flat layout.
Wrapped Convenience: Having wrapped items makes it easier for guests to grab a treat to “save for later” or for kids to handle without getting sticky fingers.
The “Red, White, and Blue Ribbon” Board
This board moves away from the random scattered look and focuses on a Linear “Stars & Stripes” theme. It uses rows of red and white snacks to mimic the American flag, with a cluster of blue and darker fruits representing the “union” or star field in the corner.
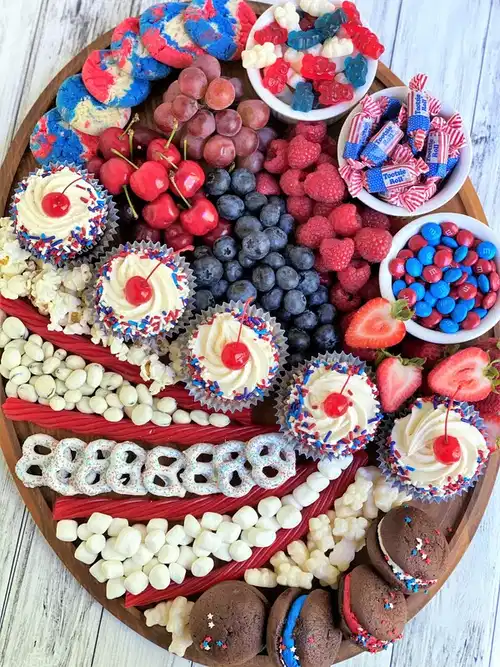
What You’ll Need to Make It
This board relies on “structural” items that can be laid in straight or curved lines:
- The “Stripes”: Red licorice twists acting as dividers, with rows of mini marshmallows, white chocolate-covered pretzels, popcorn, and yogurt-covered raisins in between.
- The “Star Field” (Top Left): Darker fruits like blueberries, red grapes, raspberries, and cherries, along with a few red/white/blue tie-dye cookies.
- Bakery Centerpieces: Vanilla cupcakes with high frosting peaks, topped with a maraschino cherry and patriotic sprinkles.
- Small Bites: Whoopie pies or sandwich cookies with tinted frosting (red and blue fillings) and small bowls for gummy bears and M&Ms.
- The Base: A large, dark wood oval or round board to ground the bright colors.
Is It Easy to Make?
It’s a “Level 2” board. While the items are easy to find, the layout requires a bit more intentionality than the previous ones:
- The Trick: Use the licorice twists first to map out your “stripes.” This acts as a skeleton for the rest of the board.
- The Fill: Once your lines are set, you just pour the smaller white items (like popcorn or marshmallows) into the lanes you’ve created. It takes about 20 minutes to get the lines looking crisp.
What Makes It a Great 4th of July Board?
- Texture Play: You have the crunch of the pretzels, the fluff of the popcorn, the juiciness of the fruit, and the creaminess of the frosting—all in one bite-sized spread.
- Clever Symbolism: It doesn’t just use the colors; it uses the geometry of the flag. This makes it feel very curated and “high-effort” to guests.
- The “Real Food” Balance: Out of all the boards we’ve looked at, this one has the highest fruit-to-candy ratio. The cherries, grapes, and berries provide a fresh, tart contrast to the sugary marshmallows and frosting.
- Height & Dimension: The cupcakes and whoopie pies give the board a 3D effect, making it look much more abundant and professional.
The “Grand Finale” Dessert Tray
This board is a high-contrast, Maximalist Americana theme. It leans heavily into bold graphic elements—specifically the flag-themed cookies—and uses a mix of matte and glossy textures to create a tray that looks like a fireworks display in snack form.
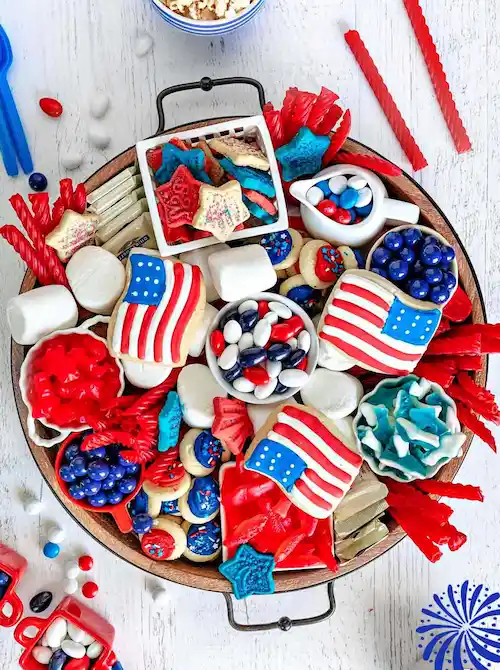
What You’ll Need to Make It
This board is all about the “props” and the specific shapes. To recreate this look, you’ll need:
- The Statement Pieces: Large sugar cookies decorated as American flags and star-shaped cookies in varying sizes/colors.
- The Fillers: Jumbo white marshmallows, red licorice twists (bundled and placed at the edges to look like firecrackers), and mini frosted cookies.
- The Small Details: Red, white, and blue jelly beans and chocolate-covered blueberries (or dark blue gumballs).
- Unique Serveware: A variety of small white and red ramekins, plus a small white square basket or crate to hold the star cookies.
- The Base: A round wooden tray with black metal handles for a modern-meets-rustic touch.
Is It Easy to Make?
Yes, it’s very beginner-friendly. Unlike the “linear” board, this one follows a “cluster” method. There is no strict pattern, which means you can’t really mess it up.
- Pro Tip: Start by placing your ramekins and flag cookies first as your “anchors.”
- The “Stuffing” Method: Use the jumbo marshmallows and licorice bundles to fill the large gaps between the bowls. It takes about 15 minutes to assemble everything into this “overflowing” look.
What Makes It a Great 4th of July Board?
- Interactive Height: The licorice “firecrackers” sticking out the sides and the stacked star cookies give the tray a 3D personality that looks great in flat-lay photography.
- Graphic Clarity: The flag cookies act as instant “labels” for the holiday. Even from across the room, guests know exactly what the occasion is.
- Smart Containment: By using lots of small bowls and baskets within the tray, the board looks organized and keeps the smaller candies from rolling around when the tray is moved.
- Varied Color Depth: It uses a mix of bright primary reds and deeper navy blues, which gives the board a more sophisticated look than one-tone boards.
The “Star-Spangled Sweet & Savory” Grazing Tray
This board introduces a Balanced Celebration theme. Unlike the others which were purely dessert-focused, this layout bridges the gap between a snack tray and a dessert platter. It combines salty elements like crackers and pepperoni with sweet treats, making it a versatile choice for an afternoon BBQ where guests want a bit of everything.
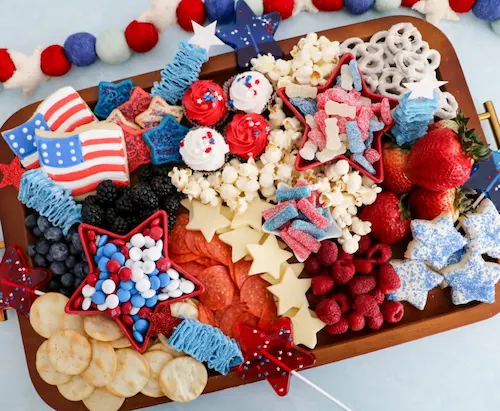
What You’ll Need to Make It
To get this “all-in-one” look, you’ll need to balance a few different food groups:
- The Savory “Core”: Round butter crackers, pepperoni slices, and white cheddar cheese (cut into stars using a small cookie cutter).
- The Sweet “Stars”: Red and blue star-shaped bowls filled with M&Ms and sour gummies.
- Bakery & Confections: Flag-shaped sugar cookies, mini frosted cupcakes, white chocolate-covered pretzels, and blue-drizzled wafer treats.
- Fresh Produce: A heavy focus on red and blue fruit—strawberries, raspberries, blueberries, and blackberries.
- Popcorn “Filler”: Plain or kettle corn to act as a neutral-colored base in the center.
- The Base: A medium-toned wood tray with gold handles for a “boutique” feel.
Is It Easy to Make?
Yes, it’s very manageable. The key is the “Star Center” strategy:
- Placement: Place your star-shaped bowls and lollipops first to create your main focal points.
- Slicing: The only real “prep” is slicing the strawberries and using a cookie cutter for the cheese stars.
- Flow: Build the crackers and pepperoni in a “river” or cluster on one side, then balance the other side with the fruit and sweets.
- Assembly Time: About 20 minutes, including the time to cut the cheese stars.
What Makes It a Great 4th of July Board?
- Multi-Purpose: Because it has crackers and protein (pepperoni), it works well as an appetizer tray before the main meal, not just as a dessert.
- The “Cheese Star” Detail: This is a small, inexpensive touch that immediately elevates the board. It shows intentional styling and makes the savory section feel just as festive as the cookies.
- Palette Variety: By including blackberries and pepperoni, you get deeper shades of purple and burgundy that contrast beautifully with the bright red strawberries and blue icing.
- Volume & Abundance: Using popcorn as a “filler” in the middle is a pro trick—it makes the board look overflowing and lush without requiring a massive budget for expensive candies or berries.
The “Firecracker Candy Crate”
This board is a High-Texture Sugar Rush theme. It’s designed to look like a box of fireworks, utilizing long, spindly candies and “explosive” shapes to create a sense of movement and energy. It moves away from the flat, scattered look and leans into a more “bundled” and vertical style.
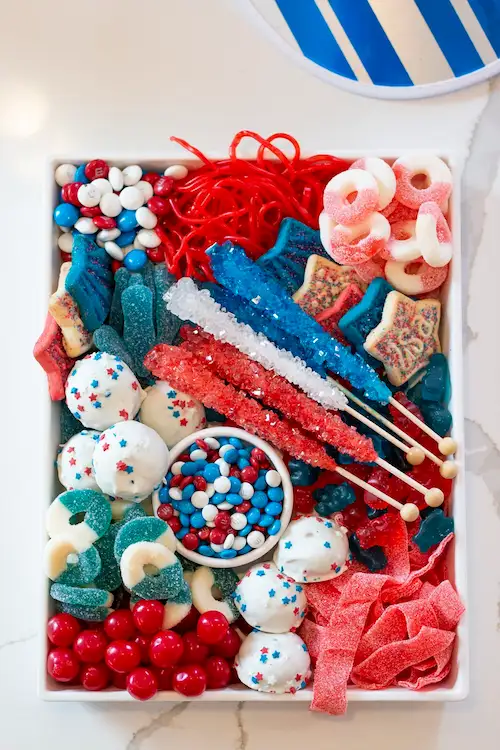
What You’ll Need to Make It
To capture this specific “firecracker” energy, look for these items:
- The “Fuses”: Red “pull-n-peel” licorice or string licorice bunched at the top.
- The “Sparklers”: Red, white, and blue rock candy sticks laid diagonally across the center.
- Gummy Elements: Red and blue sour belts (folded like ribbons), sour gummy rings (peach/blue raspberry), and blue gummy sharks or bears.
- Chocolate & Crunch: White chocolate-covered pretzel balls (tossed with star sprinkles), red gumballs or cherry sours, and a small central bowl of patriotic M&Ms.
- The Base: A rectangular white ceramic tray or a shallow wooden crate with high sides to keep the “firecrackers” contained.
Is It Easy to Make?
Yes, it’s one of the fastest layouts. Because it uses a high-sided tray, you don’t have to worry about the edges looking “perfect.”
- The Strategy: Start with the larger, heavier items (the white pretzel balls and gummy rings) to create the corners.
- The Layering: Lay the rock candy sticks last. Placing them on top of the other candies gives them height and makes them the focal point of the “explosion.”
- Assembly Time: 10–12 minutes.
What Makes It a Great 4th of July Board?
- Grab-and-Go: Since most items are gummies or hard candies, it’s a very “clean” board—no crumbs or melting frosting to deal with while hosting.
- Texture Overload: The contrast between the crystalline rock candy, the smooth white chocolate balls, and the matte gummy rings makes it visually stimulating and “high-definition” for photos.
- Vertical Interest: By leaning the rock candy sticks up and bunching the string licorice, you create a 3D effect that feels more exciting than a flat plate of cookies.
- Color Saturation: This board uses very little “neutral” space. Every inch is packed with saturated reds and blues, which makes the white elements (marshmallows or pretzel balls) pop intensely.
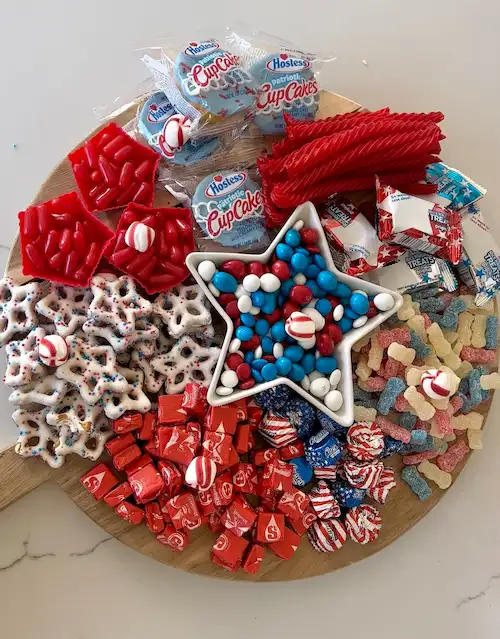
The “Pantry-to-Platter” Patriotic Board
This board follows a Convenience & Classics theme. It’s the ultimate “no-stress” version of a holiday platter, relying entirely on recognizable, store-bought snacks that come pre-packaged or ready to pour. It’s perfect for a casual neighborhood block party where the goal is easy sharing and even easier cleanup.
What You’ll Need to Make It
This board is great for a quick supermarket run. You’ll need:
- The “Hostess” Hero: A few individually wrapped Hostess Patriotic Cupcakes (with the blue frosting).
- The Star Center: A white star-shaped ceramic bowl filled with red, white, and blue chocolate candies.
- Store-Bought Staples: Star-shaped yogurt pretzels, red licorice twists, and sour gummy kids.
- Wrapped Treats: Rice Krispie Treats (in patriotic packaging), red Starbursts, and striped peppermint balls to use as “garnish.”
- Unique Containers: Small red star-shaped silicone cupcake liners to hold smaller candies (like Mike and Ikes).
- The Base: A simple round wooden paddle board or pizza peel.
Is It Easy to Make?
This is the easiest board of the series. * Zero Prep: There is no slicing, baking, or cooking required. You are essentially just unwrapping and grouping.
- Kid-Friendly Assembly: This is a great one to let kids help with because the items are sturdy and the layout is very forgiving.
- Assembly Time: Under 10 minutes.
What Makes It a Great 4th of July Board?
- Budget-Friendly: By using bulk-buy snacks and individually wrapped items, you get a lot of “volume” on the board without a high price tag.
- Weather Resistant: Since many items are wrapped (cupcakes, Rice Krispie treats, Starbursts), they won’t dry out or attract bugs if the board is sitting outside on a picnic table.
- High Contrast: The bright red silicone liners and the white star bowl provide sharp pops of color that break up the “brown” tones of the wooden board.
- Nostalgia Factor: Most guests have a soft spot for classic snacks like Hostess cupcakes and Starbursts, making it an instant conversation starter.
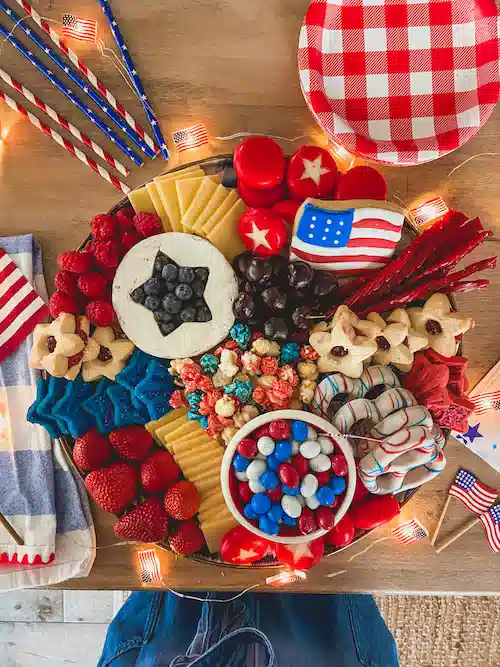
The “All-American Artisan” Platter
This board represents a Sophisticated Summer Soiree theme. It’s the most elevated of the series, blending traditional savory charcuterie elements (cheese and fruit) with beautifully detailed bakery sweets. The vibe is warm, cozy, and high-end—perfect for a sunset backyard gathering.
What You’ll Need to Make It
This board features several “boutique” details that require a tiny bit of prep:
- The Showstopper: A round of Brie cheese with a star shape cut out of the top rind, filled with fresh blueberries.
- Cheese & Charcuterie: Slices of sharp white cheddar (arranged in fans) and mini Babybel cheeses with star shapes carved into the red wax.
- Artisanal Sweets: Linzer star cookies with jam centers, blue-frosted star cookies, and a large iced flag cookie.
- The “Pop” Factor: Patriotic-themed popcorn (drizzled with red and blue white chocolate) and yogurt-covered pretzels with red and blue zig-zags.
- Fresh Produce: Whole strawberries, raspberries, and dark cherries.
- The Base: A dark metal or slate round tray to provide a moody, elegant contrast to the bright food.
Is It Easy to Make?
It’s a “Level 3” board. This one is for when you want to show off your styling skills.
- The Brie Hack: Use a star-shaped cookie cutter to gently press into the top of a cold Brie wheel, then lift out the rind and fill the “hole” with berries.
- The Babybel Trick: Use a small paring knife or a tiny star cutter to remove just the wax from the top of the cheese rounds.
- Assembly Time: About 30–40 minutes because of the manual cheese carving and precise fruit placement.
What Makes It a Great 4th of July Board?
- Atmospheric Styling: Notice the “extras” like the fairy lights and gingham plates in the background—this board is designed to be part of a larger, curated “tablescape” aesthetic.
- Rustic Elegance: The combination of fresh Brie, dark cherries, and warm wood tones feels more “grown-up” than a standard candy board.
- Interactive Design: Guests love the “star-cut” Brie; it’s a tactile, visual surprise that makes the board feel like a custom creation.
- Balanced Flavor Profile: It hits every note: salty cheese, creamy Brie, tart berries, and sweet cookies. It’s a complete tasting experience.
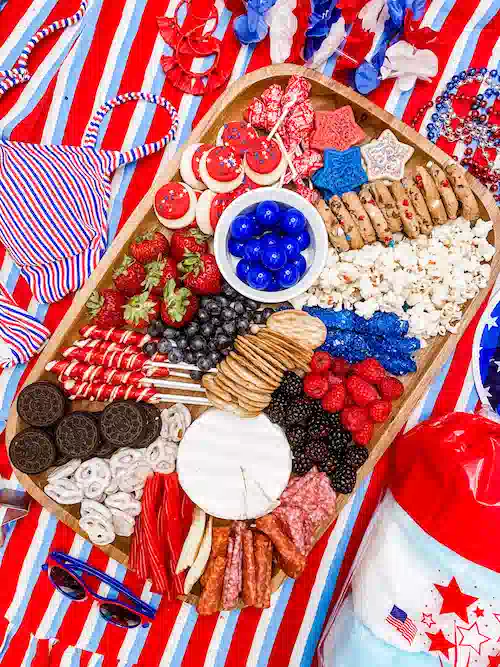
The “Red, White, and Blue Backyard BBQ” Board
This board follows a Picnic Party Grazing theme. It’s a true hybrid board that balances salty meats and cheeses with sweet bakery treats and fresh fruit. It’s styled for high-energy summer fun—perfect for a poolside gathering or a family barbecue where everyone has different cravings.
What You’ll Need to Make It
To recreate this massive, variety-packed spread, gather these items:
- Salty & Savory: Salami slices, pepperoni sticks, a round of Brie cheese, round buttery crackers, and white chocolate-covered pretzels.
- Bakery Sweets: Chocolate sandwich cookies (like Oreos), mini chocolate chip cookies, and star-shaped frosted sugar cookies.
- Fresh Produce: Strawberries (with stems on for a rustic look), raspberries, blackberries, and blueberries.
- Candy & Treats: Red and white striped lollipops, red licorice twists, blue gumballs (placed in a central white bowl), and popcorn for a light “filler.”
- The Base: A large, light-wood rectangular tray with high sides.
Is It Easy to Make?
It’s a “Level 2” board. While it doesn’t require complex carving, it does require a bit of “Tetris-style” organization:
- The Anchors: Place your Brie and the bowl of blue gumballs first to create two distinct focal points.
- The “Rivers”: Fan out the crackers and cookies in curved lines around the anchors to create a sense of movement.
- The Fill: Use the smaller berries and popcorn to plug any holes so the wooden bottom of the tray is completely hidden.
- Assembly Time: Roughly 25 minutes.
What Makes It a Great 4th of July Board?
- Photogenic Background: Notice how the board is placed on a striped red-and-blue tablecloth with matching accessories (sunglasses, swimsuits). This “flat-lay” styling makes the board look like it belongs in a high-end lifestyle magazine.
- Maximum Variety: This is the most “complete” board of the series. It transitions perfectly from an afternoon snack to a post-dinner dessert.
- Color Pop: The contrast between the stark white Brie, the deep blue gumballs, and the bright red strawberries creates a very patriotic palette that isn’t just “candy-sweet.”
- Summer Texture: Including fresh fruit makes the board feel lighter and more refreshing for a hot July day compared to a pure sugar board.
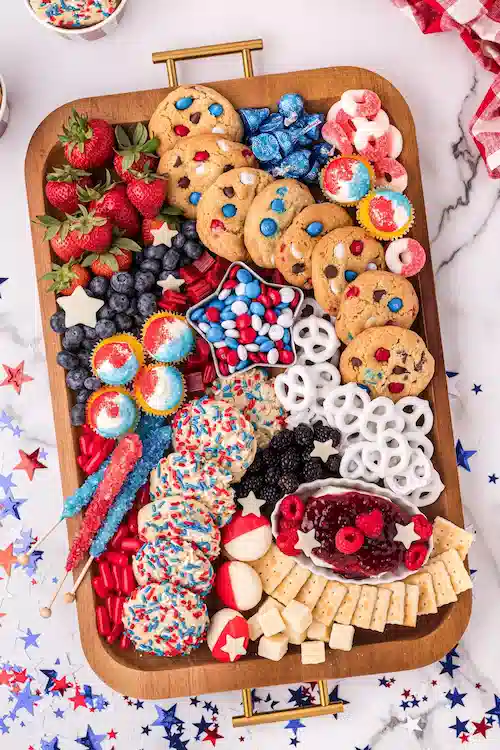
The “Star-Spangled Snack & Dip” Board
This board introduces a Dippable Dessert & Fruit theme. It stands out from the others by including a creamy dip element as a centerpiece, surrounded by “dippers” like crackers and cookies. It’s a great interactive board for 2026, where “shared experiences” and dipping stations are a major hosting trend.
What You’ll Need to Make It
This board requires a mix of fresh produce and pantry staples:
- The Hero Dip: A shallow bowl of fruit dip (like a cheesecake or marshmallow fluff base) topped with raspberry jam or preserves and fresh raspberries.
- The Dippers: Rectangular butter crackers, white chocolate-covered pretzels, and chocolate chip cookies with red, white, and blue candy gems.
- Bakery Treats: Soft-baked sugar cookies with patriotic sprinkles and mini cupcakes in bright yellow liners.
- Fresh Fruit: A generous amount of strawberries, blueberries, and blackberries.
- Candy Accents: A star-shaped tin filled with red, white, and blue chocolate candies, plus some blue foil-wrapped chocolate kisses and rock candy sticks.
- Cheese Stars: White cheddar cheese cubes and star-shaped cutouts to add a savory pop.
- The Base: A long wooden rectangular tray with gold handles.
Is It Easy to Make?
Yes, it’s very straightforward. * The Secret: Use the “anchor” items first. Place the dip bowl and the star candy tin on the board, then build the rows of cookies and crackers around them.
- Efficiency Tip: you can pre-cut the cheese stars and wash the fruit in advance. This allows the actual assembly to take only about 15 minutes.
What Makes It a Great 4th of July Board?
- Interactive Element: People love a dip! Having a central sweet dip makes the crackers and fruit more engaging than just sitting on a plate.
- Color Blocking: The way the blueberries and blackberries are grouped together creates a strong “blue” zone that balances the heavy red and white elements of the cookies and dip.
- Texture Variety: You have the crunch of the crackers, the soft chew of the chocolate chip cookies, and the creaminess of the dip, covering every sensory base.
- Visual Balance: The use of yellow cupcake liners and gold handles adds a touch of “golden sunshine” that complements the patriotic theme without distracting from it.
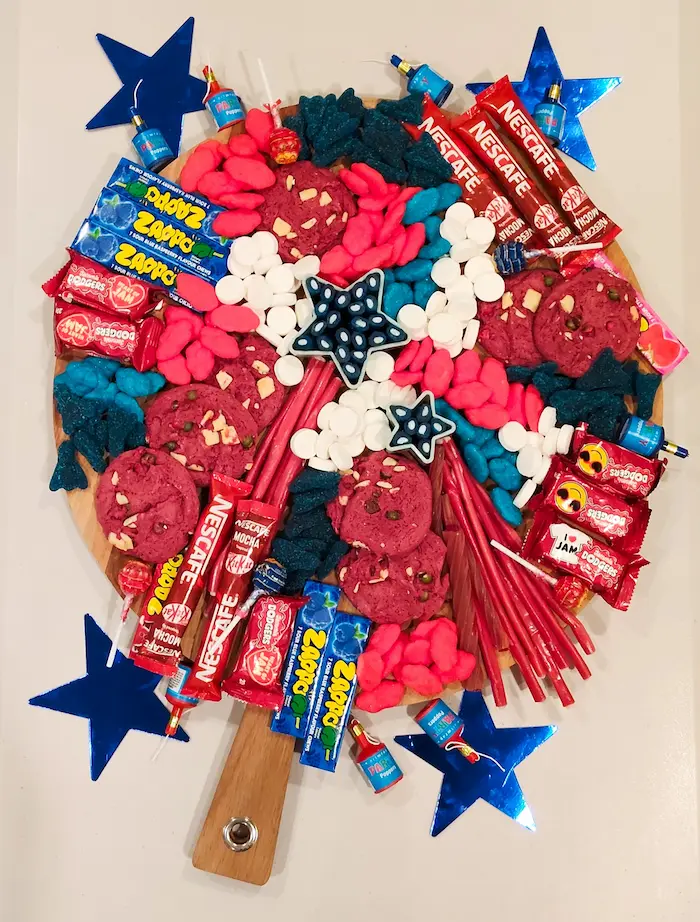
Red, White & Blue Party Dessert Board
This candy board is a vibrant, high-energy take on a traditional charcuterie platter, trading meats and cheeses for a sugar-focused “grazing board” aesthetic. It leans heavily into a bold red, white, and blue palette that makes it an immediate centerpiece for a patriotic celebration.
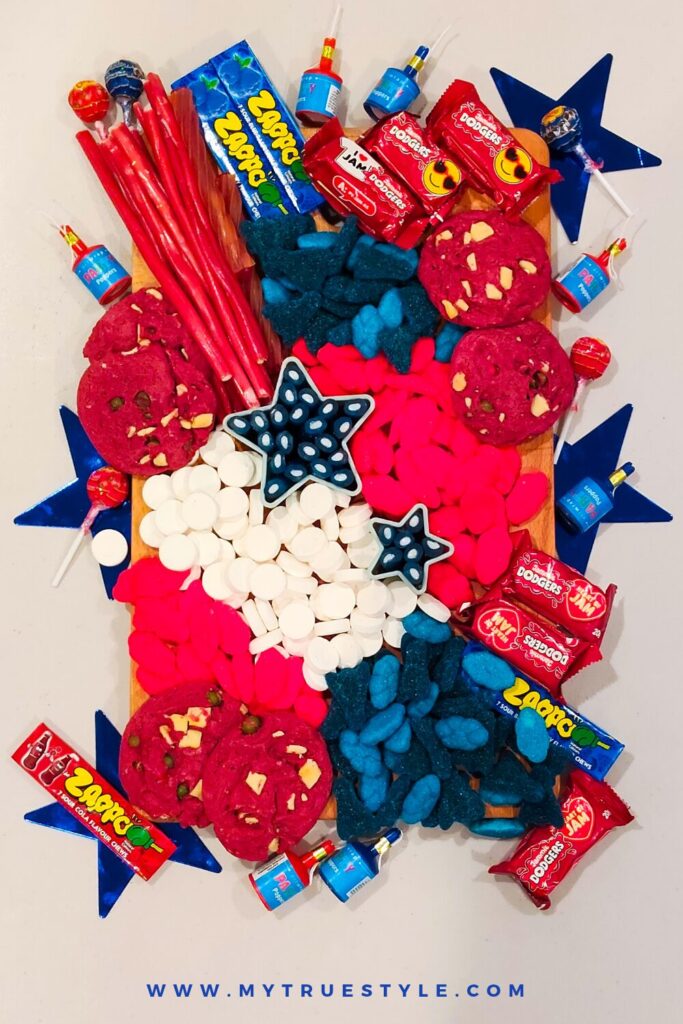
What’s On the Board?
The selection focuses on varied textures—chewy, crunchy, and airy—to keep the snacking experience interesting:
Sweets & Candies: Red licorice twists, blue sour belts, blue and red gummy fish (or similar gummy shapes), white marshmallow coins, and various lollipops.Baked Goods: Large beet-red or red-velvet style cookies with white chocolate chunks.
Crunchy Fillers: Buttered popcorn and white chocolate-coated pretzels (or yogurt drops).
Packaged Treats: Individual packs of fruit chews and “Jam Dodgers” to add structured shapes and recognizable branding to the layout.
How to Assemble It
Building a board like this is all about “organized chaos.” Follow these steps to get that professional, overflowing look:Place the Large Items First: Start by positioning the cookies and the packaged treats (like the red bags) in opposite corners or “anchors.” This prevents the board from looking lopsided.
Create Flowing Lines: Use the long items—the licorice and sour belts—to create “rivers” that divide the board into sections.
Fill the “Voids”: Pour the popcorn and small white candies into the gaps between the larger sweets. These smaller items act as the “mortar” that holds the design together.
Add Vertical Interest: Poke lollipops into the softer candies or popcorn clusters so they stand at different angles.
Decorate the Perimeter: Don’t stop at the edge of the wood. Scatter blue stars, party poppers, and extra candies around the base of the board on the table to make the display feel larger and more immersive.
Why It Works for July 4th
Visual Impact: The strict adherence to the tri-color scheme is instantly recognizable. Using blue sour belts and vibrant red cookies provides a much more saturated color pop than traditional savory boards.
Crowd-Friendly: Unlike a cheese board that might require knives or specific pairings, a candy board is “grab-and-go.” It’s perfect for outdoor parties where people are moving around.
Durability: Unlike chocolate or soft cheeses, most of these candies (licorice, gummies, popcorn) hold up well in the summer heat without melting into a mess.
The “Wow” Factor: It doubles as decor. It’s essentially a edible centerpiece that fits the festive, “more-is-more” vibe of a summer holiday.
Making it Your Own: The 3-Step Strategy
No matter the size of the crowd or the dietary goals, you can build a successful 2026-ready board by following this logic:
- Scale to the Space: For a cozy gathering of four, use a small marble slab or a dinner plate and focus on 3–5 high-quality items. For a large party, a galvanized tray or a butcher block allows you to create the “overflowing” look that feels so festive.
- Balance Your “Vibe”: * The Sweet Route: Lean into the candy-centric “Firecracker” or “Monochromatic” styles we discussed.
- The Healthy Route: Swap the gummies for skewered watermelon stars, jicama sticks (for a white crunch), and bowls of Greek yogurt dip. Use the same “color-blocking” technique to keep it patriotic.
- Batch Your Prep: To avoid being stuck in the kitchen while guests are over, prep your “anchor” elements—like the star-cut cheese or the fruit washing—well in advance. The assembly should be the fun, final step.
Final Styling Tip
The most professional-looking boards aren’t necessarily the most expensive; they are the ones with the tightest color stories. By sticking strictly to red, white, and blue, even a board made of simple pantry snacks like popcorn and strawberries will look intentional and curated.
Conclusion: “Whether you’re aiming for an artisanal Brie-centered spread or a quick pantry-to-platter candy mix, the goal is intentionality over perfection. Use these ideas as a jumping-off point to create a version that fits your table, your guests, and your true style.”