Adorable Easter Dessert Charcuterie Board: Easy No-Bake Candy Platter Idea
This Easter charcuterie board is a delightful, pastel-packed sweet spread that captures all the joy of the season in one eye-catching platter. Overflowing with fluffy marshmallows, colorful candies, pink licorice straws, round cookies, and a charming white bunny teapot brimming with jelly beans at the center, it’s the ultimate no-bake centerpiece for Easter brunch, dessert tables, or family gatherings. This dessert-style board (sometimes called a candy charcuterie board) is easy to assemble, serves 8–10 people, comes together in under 30 minutes, and costs roughly $25–45 depending on where you shop.

It answers many of the most common Easter food searches: easy Easter desserts, kid-friendly Easter snacks, popular Easter treats, what to serve for Easter brunch, and traditional Easter sweets. Classic Easter foods often feature glazed ham or lamb as the main dish, deviled eggs, hot cross buns, carrot cake, and symbolic treats like chocolate eggs and jelly beans (representing new life and spring). This board leans fully into the sweet side, delivering abundance, color, and fun without any cooking required.
Here’s exactly how to recreate this specific look step by step.
Step 1: Select the Board & Create the Green “Nest”
Use a large round wooden board or platter, ideally 14–18 inches in diameter (a cheese board, charcuterie tray, or even a wide pizza board works perfectly). If you don’t have a round one, a large rectangular tray is fine—the shape is flexible.
The signature element is the bright green “grass” that turns the board into an Easter basket. Purchase 1–2 bags of green shredded paper filler (available at craft stores, dollar stores, or online), or use edible green shredded coconut (dye plain shredded coconut with a few drops of green food coloring if needed). Spread and fluff it generously around the edges to form a soft border about 1–2 inches high. This nest-like base not only looks festive but also prevents candies from sliding off. For extra flavor, lightly toast coconut shreds at 300°F for 5 minutes if using the edible version—it adds a subtle nuttiness that complements the sweets beautifully.
Step 2: Position the Centerpiece & Organize with Bowls
Place the adorable white bunny-shaped teapot, bowl, or ceramic container directly in the center—this is the focal point that draws everyone in. Fill it generously with pastel mini jelly beans, chocolate eggs, or a mix of both, letting some spill over the edges for a playful, overflowing effect.
Arrange 4–5 small pastel-colored bowls or ramekins (pink, mint green, white, or light blue) around the bunny. Use these to contain messier or loose items:
- Pink and white mini marshmallows
- Green sour gummies or lime jelly beans
- Pink/red licorice twists or strawberry ropes
- Shredded pink coconut or extra sprinkles
Grouping like this keeps the board tidy and visually appealing while making it easy for guests to scoop what they want.
Step 3: Layer the Cookies & Textural Elements
Scatter round cookies in a loose circle around the center to create a wreath-like pattern. Choose a mix of flavors, colors, and sizes for interest:
- Pink-frosted sugar cookies or shortbread rounds
- Chocolate sandwich cookies (Oreos or similar in pastel packaging if available)
- Vanilla wafers or animal crackers with pink icing
- Any speckled or sprinkle-topped mini egg cookies
Overlap them slightly for that abundant look. Add height and fun by standing bundles of pink Pocky sticks, strawberry licorice straws, or broken candy canes upright in small clusters—they resemble ribbons or straws and add vertical drama.
Step 4: Fill Gaps with Candy Abundance
Now fill every remaining space with smaller candies and treats until the board feels full and overflowing:
- Piles of pastel marshmallows (white and pink)
- Mini Cadbury chocolate eggs, Robin’s Eggs, or similar
- Green M&Ms, Smarties, or Jordan almonds
- Pastel gummy worms, bears, or sour straps
- Speckled jelly beans or fondant mini eggs
- Extra pieces of pink/red licorice
Tuck smaller items into the green grass so they nest securely and nothing rolls away. The goal is lush, generous coverage—no bare board showing through.
Step 5: Final Adjustments & Presentation
Step back and fluff the green grass one last time to perfect the nest effect. Add tiny edible flowers, pastel sprinkles, or small bunny figurines for extra charm if desired. Serve with small plates, napkins, and toothpicks or tongs for easy sharing.
This board works beautifully as the sweet highlight of Easter brunch (pair it with hot cross buns, carrot cake slices, or fresh fruit), or as a festive dessert after a classic ham or lamb dinner. It’s naturally adaptable for gluten-free diets by choosing appropriate candies, and kids absolutely love it—they’ll have fun “hunting” for their favorites.
That’s it—one stunning, joyful Easter charcuterie board that’s all about color, sweetness, and effortless wow factor. Assemble it, snap a photo, and watch it disappear in minutes.
Variations
If you don’t have a large round board – or if you are short on time or having a smaller party, then a rectangular board might be a better options.
Linear Rectangle Board
This example is a simple liner arrangement that is ever quicker to put together.

The Ingredient List
This board uses a mix of classic sweets and biscuits, many of which look like Australian pantry staples:
- Biscuits: Pink “Oreo-style” sandwich cookies, iced “Tic Toc” style biscuits (with the heart centers), round sprinkle cookies (hundreds and thousands), and golden cream biscuits.
- Musk Sticks: Those long, ridged pink sticks are used as horizontal and vertical “fences” to divide the sections.
- The Bowls (Center Spine): Three glass bowls stacked vertically through the center containing:
- Top: Pastel candy-coated chocolate eggs.
- Middle: White candy melts or “buttons.”
- Bottom: Sour gummy worms.
- Soft Sweets: Pink and white heart-shaped marshmallows, yellow “banana” style marshmallows, and red gummy “lips” or strawberries for a punch of brighter color.
- Fillers: Small mini-marshmallows and chocolate eggs scattered in the gaps between the bowls.
How to Recreate the Linear Look
While the first board was about “flow,” this one is about sections and symmetry.
1. Create the Center Axis Place your three small glass bowls in a straight line down the very center of the board. This acts as your “anchor” or “spine.”
2. Mirror Your Sections To get this specific look, what you do on the top-left, you should roughly repeat on the bottom-right.
- Example: Notice the four golden cream biscuits in the top-left corner are mirrored by four in the bottom-right corner.
3. Use “Block” Layering Instead of scatter-stacking, lay the biscuits down in overlapping “rows.” Start from the outside edges of the board and work your way toward the center bowls.
4. The Musk Stick “Dividers” Use the long pink musk sticks to create hard borders. They act as “shelves” that hold the smaller gummies and marshmallows in place, preventing them from rolling into the biscuit rows.
5. Final Framing This board is set on a light pink linen tablecloth. To finish the look, scatter a few foil-wrapped chocolate eggs and a stuffed bunny around the outside of the board rather than on it.
Rectangle Board With Pastel Eggs in Dishes
This Easter dessert board is a vibrant, “maximalist” display that leans into a pastel spring palette. It’s essentially a candy and biscuit charcuterie board that swaps out savory meats for sweet treats.
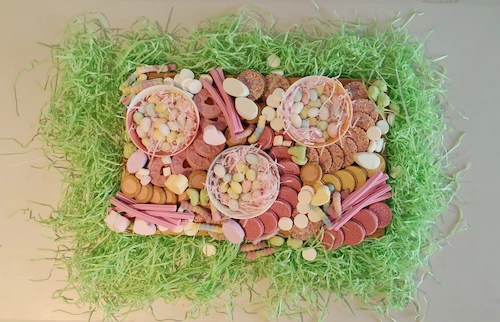
What’s on the Board
On this board I used a a mix of store-bought sweets arranged for high visual impact:
- Biscuits & Cookies: Pink-filled Oreos, sprinkle-topped shortbread rounds, iced ring biscuits, and golden sandwich cookies.
- The “Main” Bowls: Three small bowls filled with pink shredded paper (edible or decorative) and pastel candy-coated chocolate eggs.
- Soft Sweets: Pink marshmallows (hearts and cylinders), gummy worms, and musk sticks (the long pink ridged candies).
- Fillers: Small white candy melts or “buttons” used to plug any gaps between the larger items.
- The Base: A wooden board nestled in a bed of green shredded paper “grass.”
How to Assemble Your Own
Building a board like this is all about layering and grouping rather than perfectly straight lines.
1. Set Your Anchors Place your three bowls on the board first. Positioning them in a “triangle” (off-center) creates a natural flow for the eye. Fill them with your shredded grass and chocolate eggs.
2. Create Movement with “Rivers” Instead of scattering items everywhere, create “rivers” of similar treats. Fan out the Oreos in a curved line or stack the musk sticks in a bundle. This makes the board look organized despite the variety.
3. Group by Color and Shape Keep similar colors together to create “blocks” of pastel pink, yellow, and white. This prevents the board from looking messy. Notice how the gummy worms are tucked in at various angles to break up the round shapes of the cookies.
4. Fill the Gaps The secret to a professional-looking board is leaving no wood showing. Once the big items are down, use your smallest candies (like the white buttons or mini marshmallows) to fill every tiny hole.
5. Frame the Board To get the look in the photo, place your wooden board inside a larger tray or directly on the table surrounded by a generous amount of green shredded paper to mimic an Easter basket.
Browse These Posts to Complete Your Easter Celebration
- Balance the sweets with savory: Every dessert board needs a salty sidekick! Check out our full Easter Charcuterie Board Guide for the perfect cheese and meat pairings, or try these Easy Last-Minute Easter Appetizers.
- Style your holiday table: Make your candy platter the star of the show by pairing it with our DIY Easter Centrepieces or these fresh Easter Kitchen Decor Ideas.
- Festive hosting style: Get your hands photo-ready for serving with our favorite Short Spring Nail Ideas.
- Keep the kids creative: If you’re hosting little ones, keep the magic going after dessert with these Easter Craft Ideas or our fun Heart-Themed Rice Krispie Treats.