Sweet Hearts, Sweet Treats: The Ultimate Heart-Themed Rice Krispie Treats
The humble Rice Krispie Treat, a nostalgic favorite, is getting a delightful makeover! Beyond its simple charm, this versatile dessert is perfect for any occasion that calls for a little extra love. We’re talking about adorable heart-shaped Rice Krispie Treats, decked out for Valentine’s Day, a fun Galentine’s gathering, a joyous engagement party, a playful hen’s night, or even just to sweeten an ordinary “just because” day. These treats are not only incredibly easy to make but also highly customizable, allowing you to add your personal touch for a dessert that’s as heartfelt as it is delicious.
What You’ll Need:
- For the Basic Treats:
- 6 cups Rice Krispies cereal
- 3 tablespoons butter (or margarine)
- 1 (10 ounce) package marshmallows (about 40 large)
- 1/2 teaspoon vanilla extract (optional, but highly recommended!)
- Pinch of salt (optional, balances the sweetness)
- For Shaping & Decorating:
- Non-stick cooking spray or extra butter
- Heart-shaped cookie cutters (various sizes for variety!)
- Melting Wafers or Chocolate Chips: Pink, white, dark chocolate, or even red candy melts for dipping and drizzling
- Sprinkles: Valentine’s themed, rainbow, pearl, or metallic sprinkles
- Parchment paper or wax paper
Pink and White Chocolate Dipped Hearts with Sprinkles
These heart-shaped Rice Krispie treats are the definition of “effortless chic.” They take a nostalgic childhood favorite and elevate them into something that looks like it belongs in a boutique bakery window. Whether you’re hosting a Galentine’s brunch or just want to brighten someone’s Tuesday, these are a total crowd-pleaser.
The Vision: Heart-Shaped Crispy Treats
The beauty of these treats lies in the contrast: the crunchy, marshmallowy base dipped in smooth, pastel-toned chocolate and finished with a dusting of micro-hearts. They are sweet, slightly salty, and perfectly shareable.
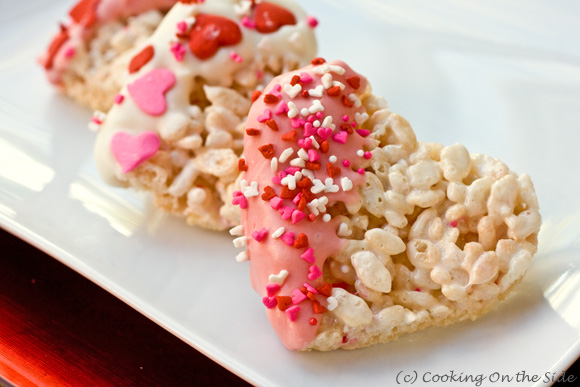
How to Recreate the Magic
To get that crisp, professional look seen in the image, follow this simple guide:
1. Prep Your Canvas
Make your standard batch of crispy rice treats (butter, marshmallows, and toasted rice cereal). Instead of cutting them into squares, press the mixture firmly into a flat baking sheet lined with parchment paper. Aim for about 2cm thickness to ensure they are sturdy enough for dipping.

2. The Shape
Once the treats have cooled and set, use a metal heart-shaped cookie cutter.
Pro Tip: Lightly grease the inside of the cutter with cooking spray or butter to prevent the marshmallows from sticking, ensuring those edges stay sharp and clean.

3. The Dip
Melt high-quality white chocolate or pink candy melts in a microwave-safe bowl. To achieve the look in the photo, only dip one half or one side of the heart. Let the excess chocolate drip off for a few seconds before laying them back down on parchment paper.
4. The Finishing Touches
While the chocolate is still “wet,” generously apply your sprinkles. A mix of tiny white, pink, and red hearts creates that layered, multidimensional texture.

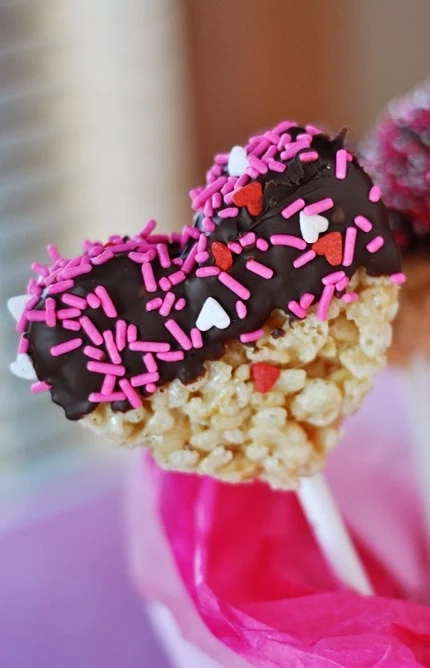
Dark Chocolate Dipped Hearts on a Stick
These heart-shaped treats take the cozy, sticky nostalgia of a stovetop mix and turn it into an editorial-worthy dessert.
The Aesthetic: Heart-Shaped Perfection
There is something so satisfying about the clean lines of a heart-cutout paired with the organic, craggy texture of the rice puffs. By focusing on a dip-and-sprinkle technique, you create a treat that feels modern rather than messy.
The Step-by-Step Edit
To achieve the professional results seen follow the process below.
The Master Mix: Start with your rice cereal and melted marshmallow base in a large pot, stirring until every grain is coated in that signature gooey webbing.
The Press: Transfer the mix to a lined tray.
The trick to a “clean girl” aesthetic is pressing the mixture firmly so the hearts hold their shape without crumbling.
The Cut: Use a metal heart-shaped cutter once the tray has cooled completely. If the marshmallow is too clingy, a tiny bit of butter on the cutter edges works wonders.
The Artful Dip: Whether you choose a soft blush pink, a classic white, or a rich cocoa dip, only coat a portion of the heart. This “half-dipped” look is much more chic than a full immersion.
The Sprinkle Strategy: Immediately add your heart-shaped micro-sprinkles while the coating is wet so they set perfectly in place.
Hosting Hack
For an extra touch of “cool-girl” effortlessness, try serving these as dessert pops. Simply insert a white lollipop stick into the base of the heart before the marshmallow sets. It makes them the perfect “walk-around” snack for a party where the conversation never stops.
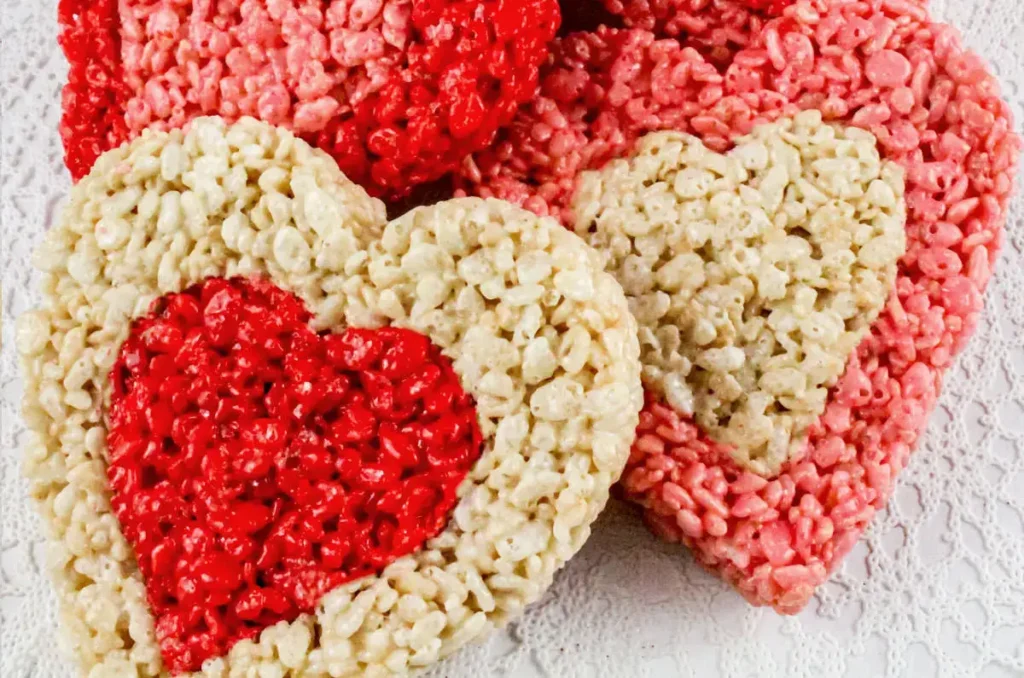
Three Toned Rice Crispy Hearts in Pink White and Red
If you’re looking for a simple way to upgrade your Galentine’s dessert spread, these heart-shaped rice krispie treats are the perfect solution. They offer a classic, nostalgic flavor with a polished presentation that works for any gathering.
The Vision: Simple and Sweet
These treats are all about the contrast between the gooey, marshmallow texture and a smooth chocolate finish. By using a few easy decorating techniques, you can turn a basic snack into a festive centerpiece that looks great on any table.
The Step-by-Step Guide
The Master Mix: Begin by melting butter and marshmallows in a large pot, then fold in your rice cereal until every piece is evenly coated in the sticky mixture.
Creating Layers: To achieve a multi-colored effect, divide your mixture into separate bowls and stir in a few drops of red or pink food coloring to create a beautiful tonal variety.
The Heart Cutout: Press the mixture firmly flat. To create this look, you can cut smaller hearts out of the center of larger ones and swap the colors to create a layered, “nested” effect.
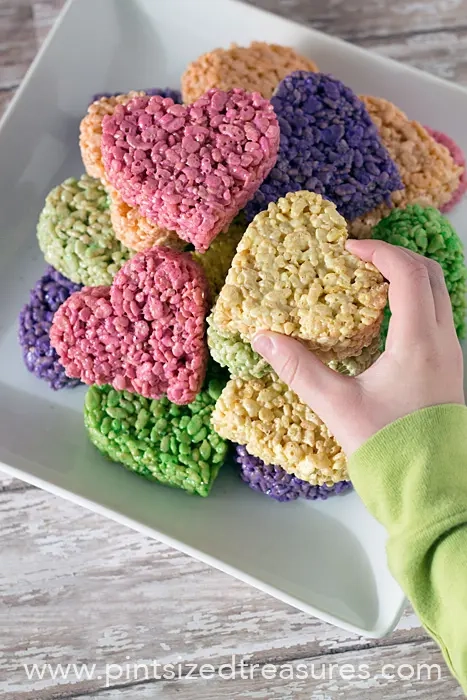
Coloured Heart Shaped Rice Krispy Treats
Making these heart-shaped rice cereal treats is a simple way to add a festive touch to any celebration. The process begins by creating a classic gooey base in a large pot, melting butter and marshmallows together before folding in the toasted rice cereal until it is completely coated.
Crafting the Hearts
To achieve the vibrant, multi-colored look seen in some versions, you can divide your warm mixture into separate bowls and stir in food coloring to create a tonal palette of pinks, reds, or even purples. Once mixed, press the cereal firmly into a lined baking sheet. After the mixture has cooled and set, use a metal heart-shaped cookie cutter to create clean, sharp edges.
Words of Love Rice Crispy Treats
Creating these heart-shaped rice cereal treats is a simple, high-impact way to bring a little extra sweetness to your table. Whether you’re making them for a holiday or just because, the process is straightforward and allows for endless creativity.
The Process: From Pot to Plate
The foundation is a classic, gooey mixture that comes together in minutes:
The Master Mix: Start by melting butter and marshmallows in a large pot.
The Blend: Fold in your toasted rice cereal until every grain is evenly coated in the sticky marshmallow webbing.
The Shape: Press the mixture firmly into a lined tray. Once cooled, use a metal heart-shaped cookie cutter to create sharp, clean shapes.
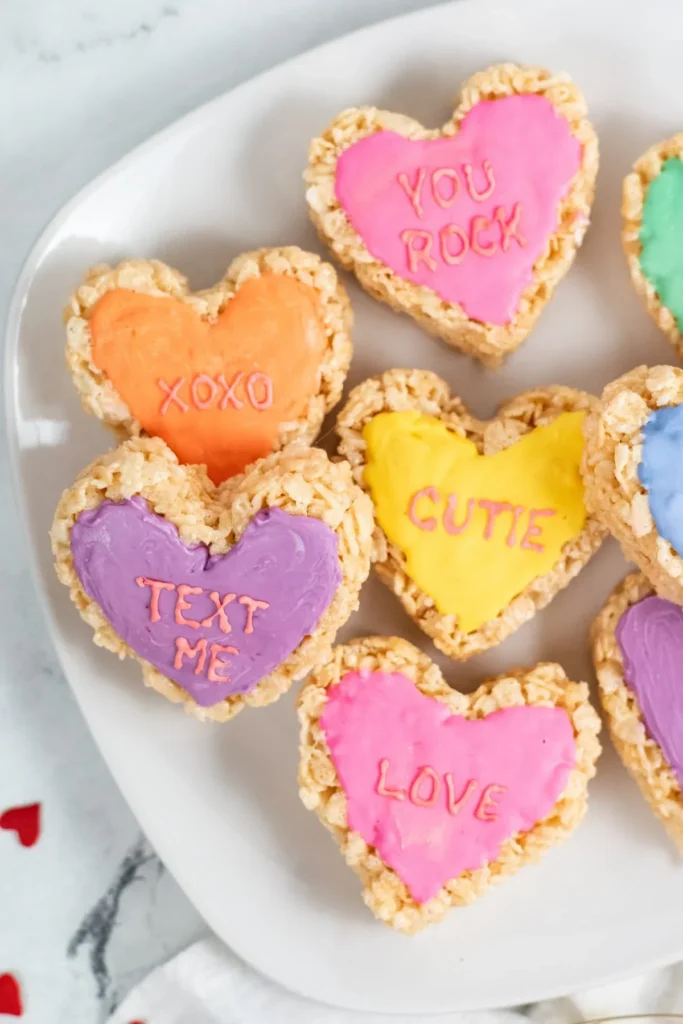
If you’re moving away from the dipped look and want a full-coverage finish, turning these treats into “Conversation Hearts” is a fantastic way to customize your dessert. This method transforms the rustic texture of the cereal into a smooth, colorful canvas perfect for personalized messages.
Designing Your Conversation Hearts
To achieve the vibrant, message-ready look seen in the inspiration, follow the steps below.
The Base Layer: Instead of dipping a corner, spread a smooth, even layer of melted colored chocolate or royal icing across the entire top surface of the heart.
Color Palette: Use different bowls of icing to create a variety of shades like soft pink, lavender, mint green, and orange for that classic candy-box feel.
The Message: Once the base layer has set, use a small piping bag filled with a contrasting color of icing or melted chocolate.
Text Ideas: Pipe short, sweet phrases such as “XOXO,” “CUTIE,” “LOVE,” or “TEXT ME” directly onto the center of the heart.
The Finish: Ensure your piping is steady and the icing is thick enough to hold its shape so the letters remain crisp and legible.
Tips for a Clean Finish
Smoothing the Icing: Use an offset spatula to push the icing to the very edges of the heart-shaped cereal base for a clean, professional border.
Setting Time: Allow the base layer to dry completely before piping your messages to prevent the colors from bleeding together.
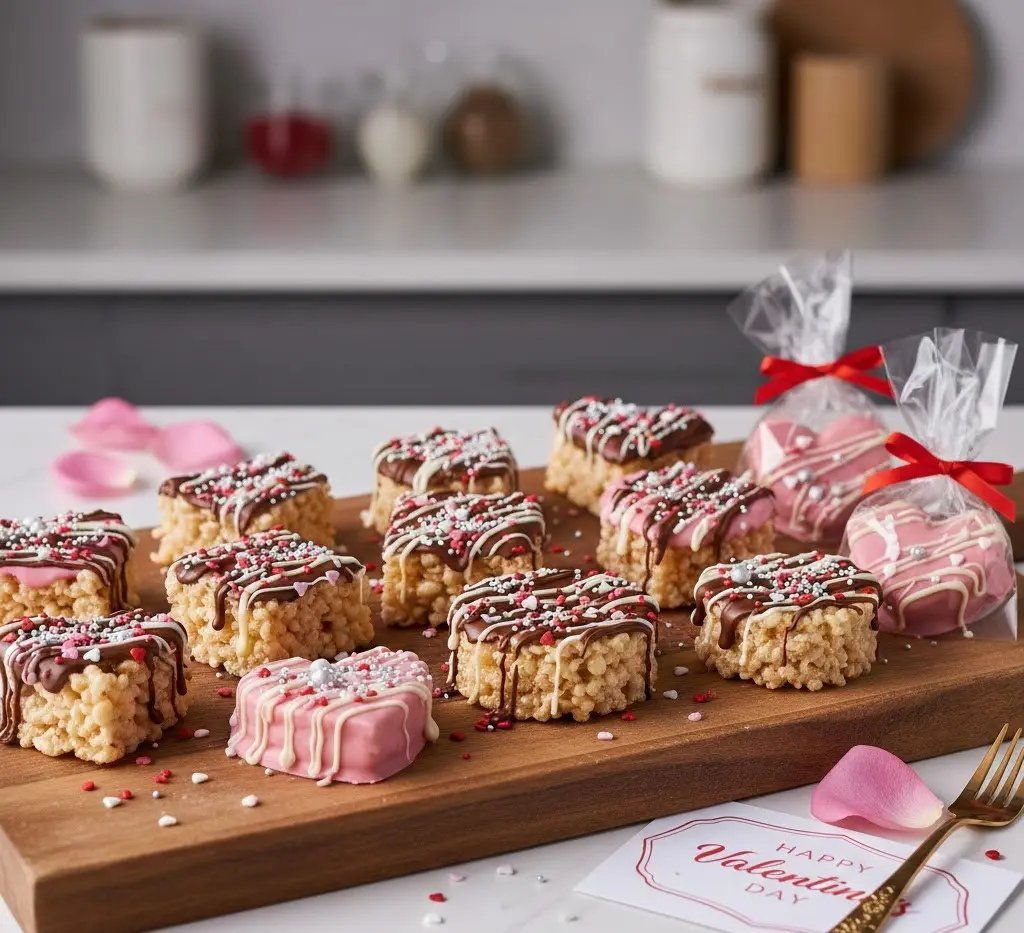
Pink and Milk Chocolate Coated Rice Krispie Hearts
If you’re ready to move beyond basic bars, these Decadent Drizzled Hearts offer a rich, textured twist on a pantry staple. Instead of simple decorations, this approach focuses on layering flavors and finishes to create a gourmet look that feels intentionally handcrafted.
The Vision: Layered & Lustrous
This style celebrates the contrast between the irregular, crispy texture of the cereal and a sleek, multi-toned chocolate finish. By combining a full-surface coating with a contrasting drizzle, you create a dessert that looks high-end and feels incredibly indulgent.
The Step-by-Step Edit
The Foundation: Begin with your classic rice cereal and marshmallow base, pressed firm and cut into precise heart shapes once set.
The Full Coat: Submerge the top of each heart into a bowl of melted colored chocolate or tinted icing to create a smooth, opaque “canvas”.
The First Detail: While the base coat is still tacky, add a light dusting of festive heart-shaped sprinkles or nonpareils to ground the design.
The Artful Drizzle: Once the base layer has firmed up, use a piping bag or a fork to zigzag a contrasting shade of chocolate across the top.
The Tonal Effect: For the most visual interest, try drizzling white chocolate over a dark base, or a deep red drizzle over a soft pink coating to create depth and movement.
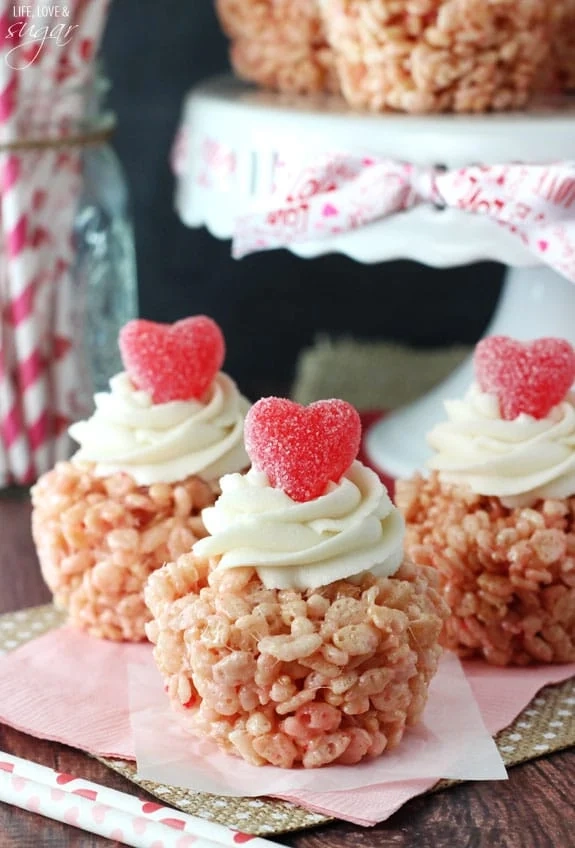
Cupcake Rice Krispie Treats with Heart Candy
If you are looking to combine the crunch of a cereal treat with the charm of a bakery classic, these Rice Krispie Treat Cupcakes are the perfect hybrid dessert. By stepping away from the traditional flat square and utilizing a standard cupcake tin, you create a handheld treat that feels much more special and celebratory.
Molding the Perfect Base
The transformation starts with how you shape the mixture to get that signature cupcake silhouette.
Pressing the Mold: While your marshmallow and cereal mixture is still warm and pliable, press it firmly into a greased cupcake tin.
Creating the “Cake”: Packing the mixture tightly ensures that once it cools, it retains the fluted edges of the tin and provides a sturdy foundation for the toppings.
The Set: Let the treats cool completely before removing them from the pan to prevent any crumbling or loss of shape.
The Buttercream Topping
Unlike a standard dipped treat, these are finished with a classic frosting swirl for a truly indulgent look.
The Swirl: Using a piping bag with your favorite tip, add a generous swirl of creamy buttercream icing to the top of each crispy base.
The Decorative Heart: To finish the look, place a single candy heart or a chocolate decorative piece right in the center of the frosting.
Custom Colors: You can easily tint your buttercream with food coloring to create a tonal display of pinks, reds, or whites to fit your specific theme.
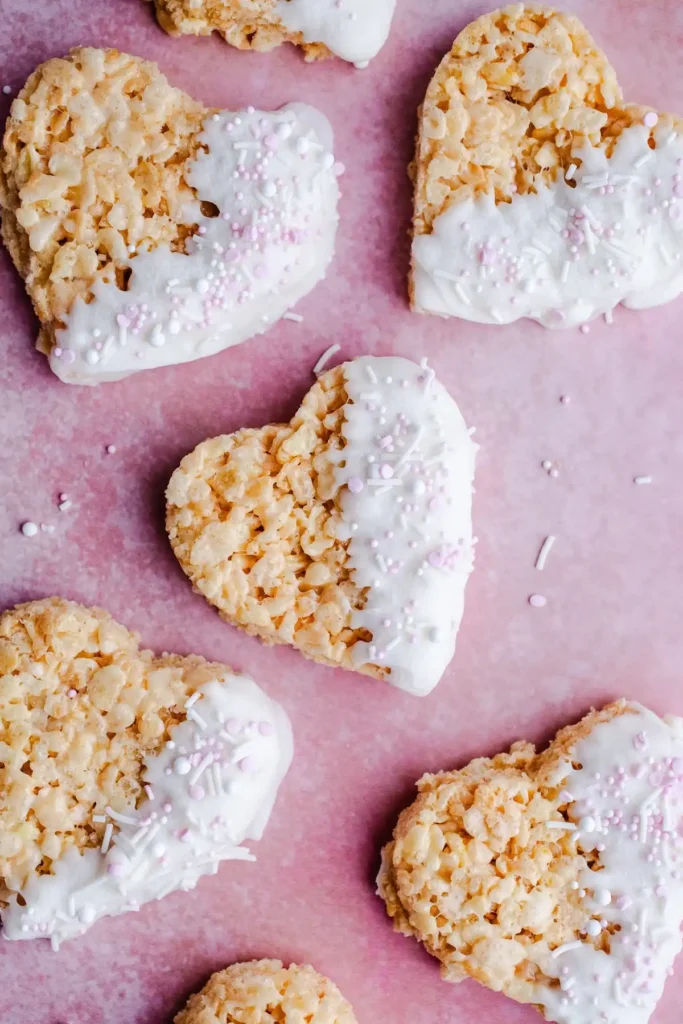
Thin Heats with White Dipped Corner
If you’re looking for the ultimate treat for a Valentine’s Day exchange or a cozy Galentine’s get-together, these chocolate-dipped hearts are a classic choice. They offer a beautiful contrast between the rustic, golden texture of the cereal and a sleek, polished chocolate finish.
The Heart-Cutout Technique
To get the clean, professional edges seen in the images, start by pressing your marshmallow and rice cereal mixture firmly into a lined baking sheet. Once the tray has cooled completely and the treats have set, use a metal heart-shaped cookie cutter to stamp out your shapes. Pressing the mixture firmly is key—it ensures the hearts stay compact and don’t crumble when they are handled during the decorating process.
The Artful Chocolate Dip
The “half-dipped” look is a simple way to make these treats feel like they came from a boutique bakery.
The Melt: Melt high-quality chocolate or colorful candy melts until smooth.
The Angle: Hold the heart by one side and dip the other half or just the top corner into the chocolate, allowing the excess to drip off before laying it on parchment paper.
The Sprinkles: While the chocolate is still “wet,” immediately add a mix of pink, white, and red sprinkles. Using a variety of sizes, from tiny nonpareils to small heart shapes, adds a playful, multi-dimensional texture.
Pro Tip for Gifting
For a thoughtful Galentine’s gift, you can turn these into “pops” by inserting a white lollipop stick into the base before the marshmallow sets. Wrap them in clear cellophane with a matching ribbon for a finished, editorial-worthy look.
Conclusion: Share the Love, One Sweet Heart at a Time
From the first gooey bite to the last crunchy corner, these treats bring warmth, joy, and a sprinkle of nostalgia. They’re easy to make, fun to decorate, and irresistible to both kids and adults alike.

There you have it—a simple yet utterly charming way to bring smiles with every bite. These heart-themed Rice Krispie Treats are more than just a dessert; they’re a blank canvas for your creativity, a symbol of affection, and a guaranteed crowd-pleaser for any celebration. Whether you’re celebrating enduring love on Valentine’s Day, cherishing friendships on Galentine’s, marking new beginnings with an engagement or hen’s party, or simply want to brighten someone’s day “just because,” these sweet hearts are the perfect token. So go ahead, get creative, and share a little bit of your heart with those you cherish most!