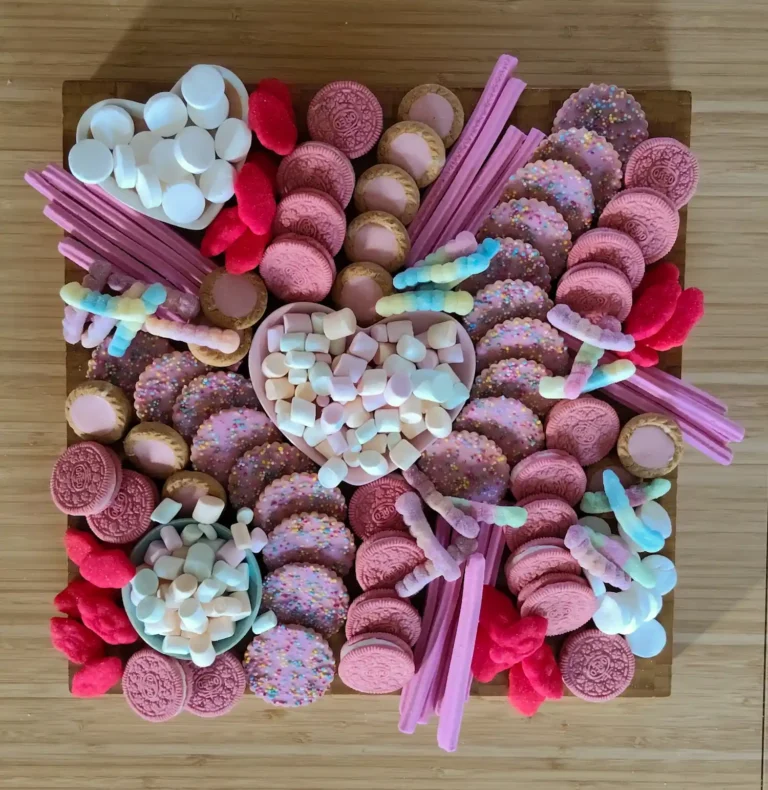
How to Make a Stunning Valentine’s Day Dessert Board
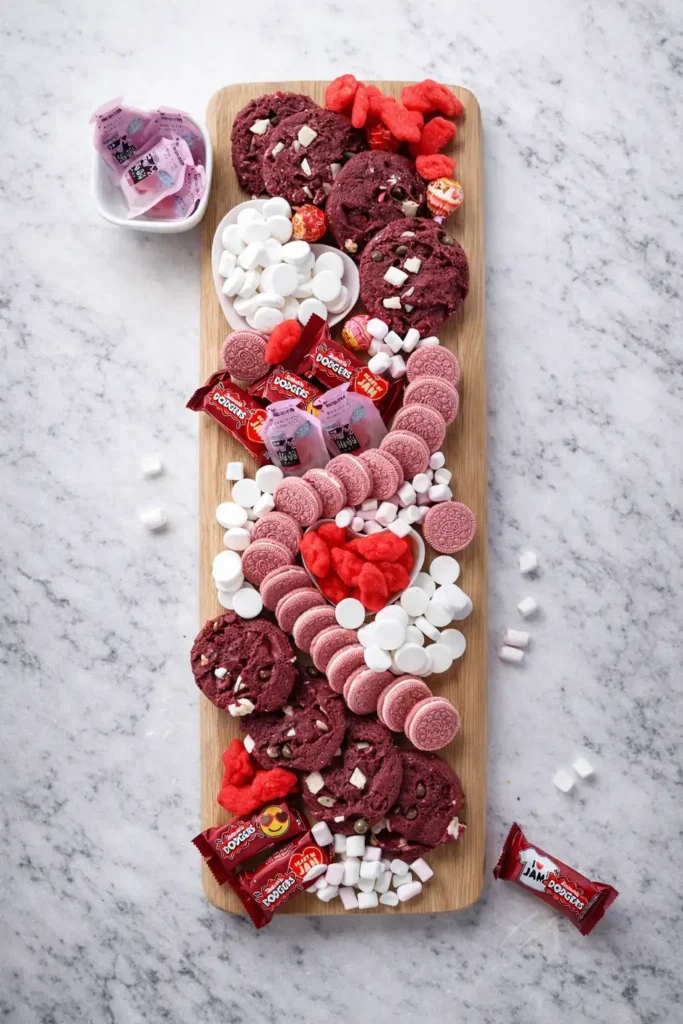
Valentine’s Day is all about indulgence, romance, and sharing sweet moments with loved ones. What better way to celebrate than with a gorgeous dessert charcuterie board? This no-bake treat platter is easy to assemble, visually stunning, and perfect for a romantic date night, Galentine’s party, or family fun. Inspired by the beautiful ombre pink-to-red board in the photo you shared, we’ll recreate that elegant gradient effect using pink, red, and white sweets.
The key to this board is the color theme: shades of pink fading into deep red, with pops of white for contrast. It creates a heart-melting ombre look that’s almost too pretty to eat (almost!).
What You’ll Need
- A large wooden board or platter (rectangular works best for this layout)
- Small bowls or ramekins for loose items like marshmallows or gummies
- Variety of pink, red, and white candies and cookies (quantities depend on board size; aim for 2-4 of each item for a medium board)
Ingredients List
Here’s a breakdown of items similar to those in your image:
- Deep Red Items:
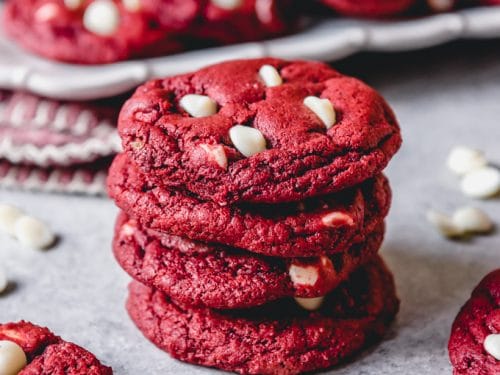
- Red velvet cookies with white chocolate chips (store-bought or homemade)
- Red gummy candies (like heart-shaped Swedish Fish or cinnamon hearts)
- Mini chocolate bars in red wrappers (e.g., Kit Kat or similar Valentine’s editions)
- Pink and Light Red Items:
- Pink-coated chocolate cookies (Valentine’s edition pink Oreos or similar wafer cookies)
- Pink and red wrapped candies (like Starburst or individually wrapped chocolates)
- Heart-shaped gummies in mixed pink/red
- White Items:
- Mini marshmallows (regular or heart-shaped if available)
- White mints or yogurt-covered pretzels/raisins
- White chocolate pieces or kisses
- Extras for Texture and Fun:
- A few colorful lollipops or hard candies for height
- Scattered mini marshmallows around the board for a snowy effect
Step-by-Step Instructions
- Prep Your Board: Start with a clean wooden board on a flat surface. Place 2-3 small bowls strategically—one at the top for white items, one in the middle for red gummies, and perhaps one for mints.
- Create the Ombre Gradient: This is the magic part!
- Start at one end with deep red items: Pile red velvet cookies and scatter red gummies.
- Transition to medium pinks: Arrange stacks of pink Oreo-style cookies and pink-wrapped candies.
- Fade into light pink and white: Add white marshmallows in bowls and scattered around, with lighter pink cookies.
- Arrange for Visual Appeal:
- Stack cookies in small piles or rows for height.
- Fill gaps with loose candies and marshmallows.
- Place larger items (like cookie stacks) as focal points.
- Tuck in wrapped candies for pops of color and easy grabbing.
- Add Finishing Touches:
- Scatter a few marshmallows or gummies off the board for a casual, abundant look.
- If desired, add fresh strawberries or chocolate-dipped fruits for a fresh twist (though this version is all shelf-stable sweets).
Tips for Success
- Shop seasonal Valentine’s candy aisles for limited-edition pink and red treats.
- Mix textures: Crunchy cookies, chewy gummies, fluffy marshmallows.
- Make it ahead: Assemble up to a few hours before serving.
- Customize: Add nuts, pretzels, or even a small bowl of chocolate dip if you want variety.
- For kids: Include more gummies and fun shapes.
This dessert board takes about 15-20 minutes to assemble and is guaranteed to impress. Pair it with sparkling rosé or hot cocoa for the ultimate Valentine’s treat. Happy crafting—and happy Valentine’s Day! 💕